No two projects are ever alike, but each will contain repetitive tasks that need to be completed daily, weekly, monthly or yearly. Thankfully, these tasks can be created without having to think about them. In this monday.com recurring tasks guide, we’ll show you how a simple automation can help ease the burden of project management.
Below, we’ll cover the benefits of using one of the best project management software platforms — monday.com — and its automations and recurring tasks tool. You’ll learn how to create a recurring task, a recurring group and recurring notifications, all of which can help your project move along swiftly to completion. We know you’re eager to learn, so let’s get started.
What Are Recurring Tasks on monday.com?
Recurring tasks on monday.com are events that repeat at specified intervals throughout the end-to-end project management cycle. Recurring tasks can be anything from daily, weekly or monthly meetings to reminders to send regular expense reports to stakeholders. Basically, any task that must happen at a set time during your project can be created automatically.
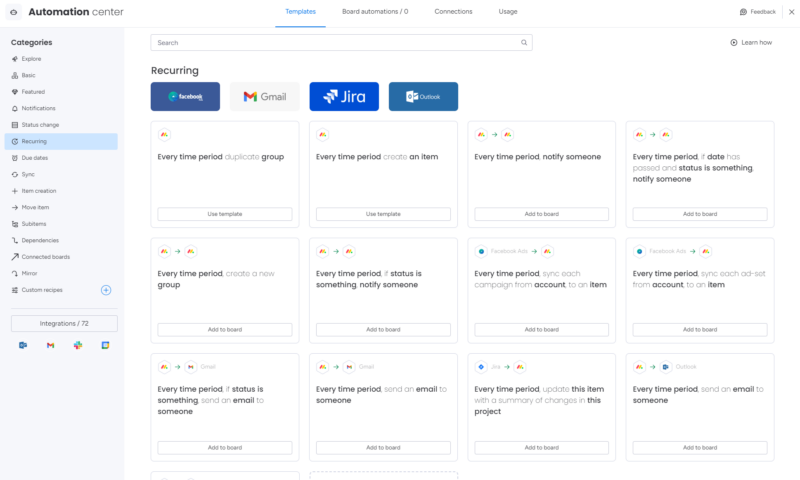
The idea behind creating automations for regularly recurring tasks is to free your mind. Instead of manually scheduling recurring tasks for routine work, you can focus on bigger tasks. Automatic recurring tasks help ensure no part of your workflow is missed. For more information about monday.com’s tools, plans and more, check out our monday.com review.
If you find monday.com isn’t for you after testing out its tools, you should look into Jira. See how monday.com and Jira stack up against each other in our monday.com vs Jira comparison. Alternatively, you can also see how monday.com fares against ClickUp in our monday.com vs ClickUp guide.
The Benefits of Using monday.com Recurring Tasks
Creating automations for future tasks on monday.com can lead to many benefits. Once you have made the effort to schedule all of your repetitive tasks, you can:
- Save time: You can easily schedule repeating items or tasks on monday.com, which can save you a significant amount of time over the life of a project.
- Protect the bottom line: Creating a recurring task instead of scheduling a task individually will not only save you time but also money, which will please clients and stakeholders.
- Increase productivity: Instead of creating a new task for repeating events every week, you can focus on other tasks, which can make you and your team more productive.
- Better project oversight: Boards, kanban boards, Gantt charts, calendars and other tools can accurately reflect recurring tasks, meaning you can have a better idea of what’s coming up in the days, weeks and months ahead. If you want to learn how to use boards, check out our guide to how to use monday.com boards.
How to Create Recurring Tasks on monday.com
Now that you know what recurring tasks are and what they can do for you, it’s time to learn how to create them on monday.com. By following the steps outlined below, you’ll be able to allocate resources effectively and schedule recurring tasks like a pro in no time.
How to Create a Recurring Task or Item in monday.com
On monday.com, you can use premade automation recipes for recurring tasks or create them manually so they better suit your needs. Below, we’ll show you how to manually create recurring tasks — specifically, a recurring task for a weekly meeting. Let’s get started.
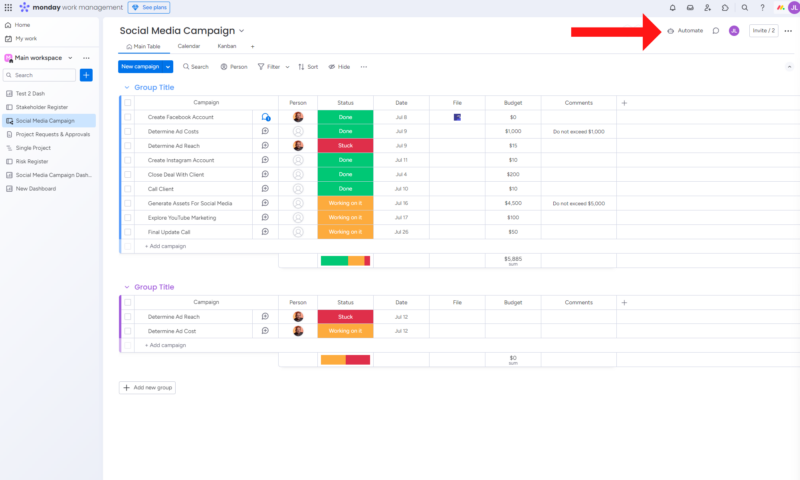
- Launch the Automation Center
From the main monday.com screen, click the “automate” button near the top right of the screen.
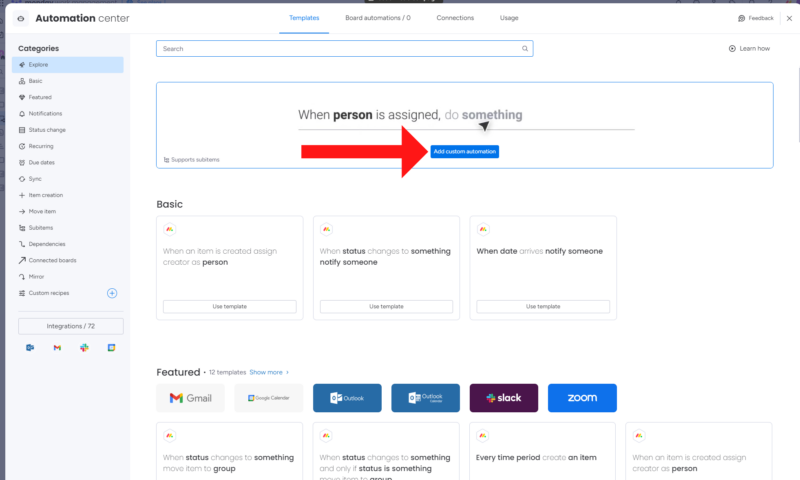
- Add a Custom Automation
Next, in the automation center, click the “add custom automation” button.
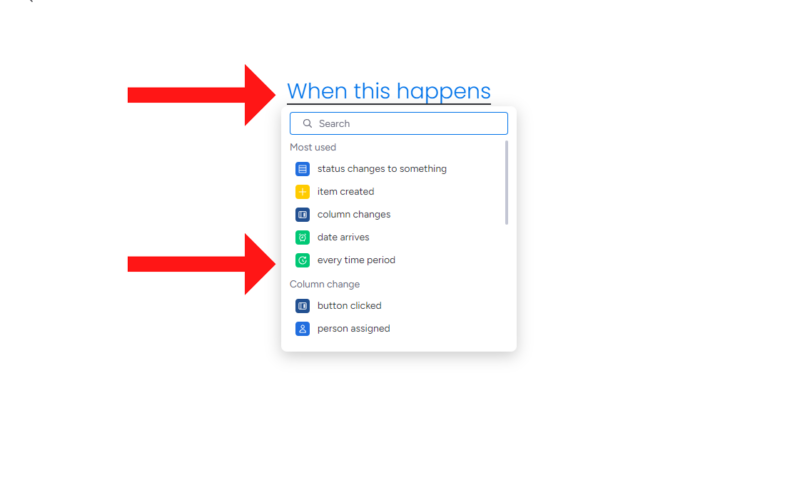
- Choose the First Parameter
Next, you’ll tell monday.com what needs to happen when a specific event takes place. For this example, we need to specify that every week at 1 p.m. on Monday, a 30-minute meeting will take place. Click the “when this happens” button and select “every time period” from the menu.
- Choose the Frequency
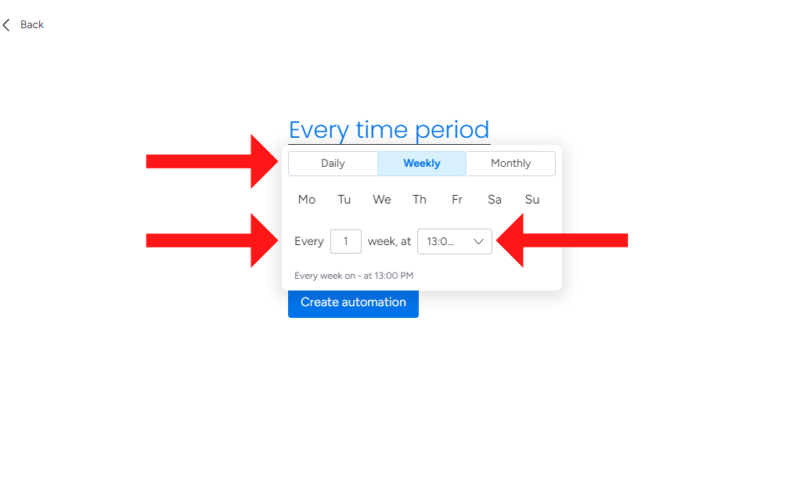
Next, click the “every time period” button and then choose the frequency of your meeting. We will select “weekly” and then “every one week at 13:00 p.m.” Then, click the “create automation” button.
- Choose an Action
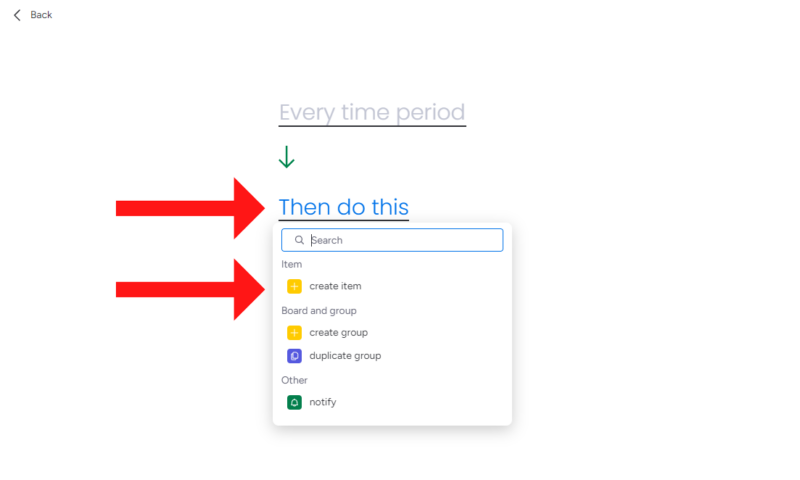
The next step is to tell monday.com what to do. Click the “then do this” button and select the “create item” option from the menu.
- Define the Item
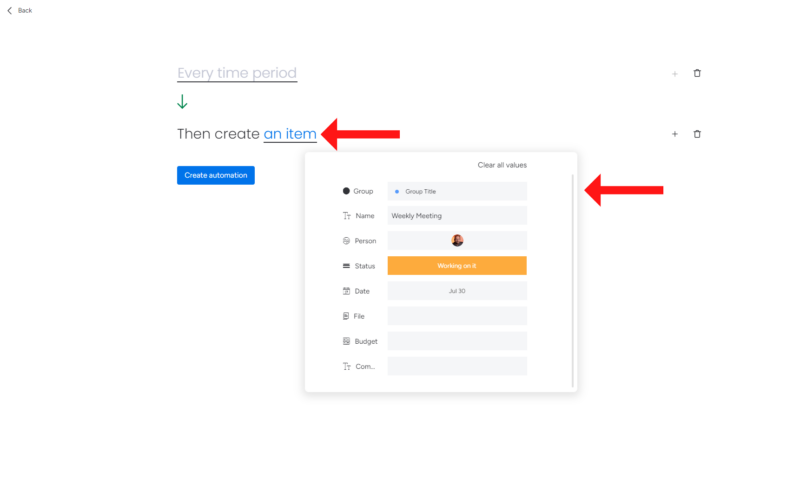
Next, click the “an item” option and then define the item options. You can choose the task’s start status, who is assigned to the item, the item’s name, its budget and more.
- Create the Automation
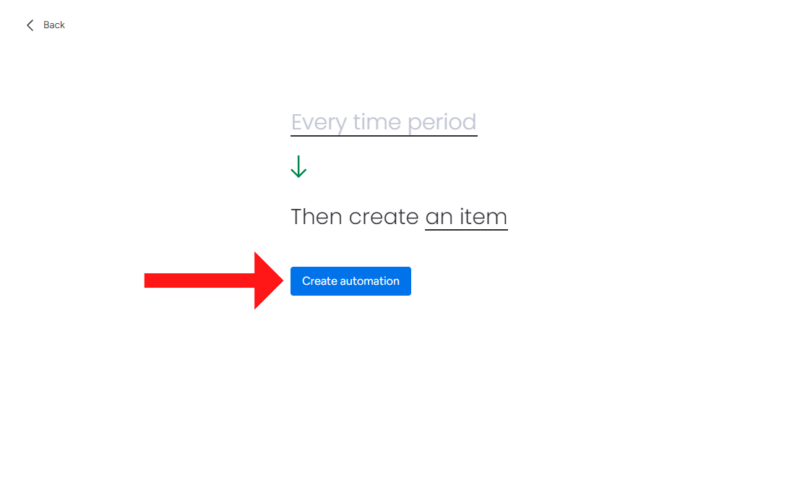
The final step is confirming the automation. To do this, click the “create automation” button.
- Manage the Automation
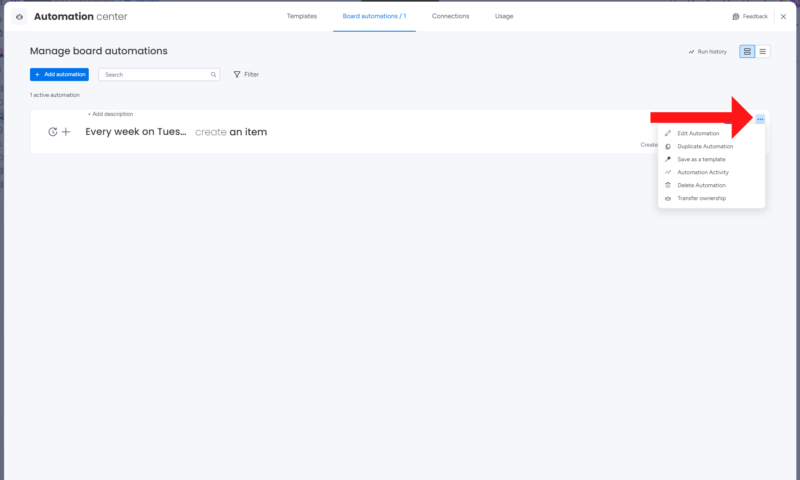
After you create the automation, the recurring task will be visible in the automation center. From here, by clicking the three dots next to the event, you can edit the recurring task, save it as a template, delete the automation and more.
{“@context”:”https:\/\/schema.org”,”@type”:”HowTo”,”name”:”How to Create a Recurring Task or Item in monday.com”,”description”:”These steps show how to create monday.com recurring tasks”,”totalTime”:”P00D04M00S”,”supply”:0,”tool”:0,”url”:”https:\/\/www.cloudwards.net\/monday-com-recurring-tasks\/#how-to-create-a-recurring-task-or-item-in-monday-com”,”image”:{“@type”:”ImageObject”,”inLanguage”:”en-US”,”url”:”https:\/\/www.cloudwards.net\/wp-content\/uploads\/2024\/08\/monday.com-Recurring-Tasks-Guide.png”},”step”:[{“@type”:”HowToStep”,”name”:”Launch the Automation Center”,”position”:1,”url”:”https:\/\/www.cloudwards.net\/monday-com-recurring-tasks\/#launch-the-automation-center”,”itemListElement”:{“@type”:”HowToDirection”,”text”:”From the main monday.com screen, click the \u201cautomate\u201d button near the top right of the screen.\n”},”image”:{“@type”:”ImageObject”,”inLanguage”:”en-US”,”url”:”https:\/\/www.cloudwards.net\/wp-content\/uploads\/2024\/08\/monday-automate-button.png”}},{“@type”:”HowToStep”,”name”:”Add a Custom Automation”,”position”:2,”url”:”https:\/\/www.cloudwards.net\/monday-com-recurring-tasks\/#add-a-custom-automation”,”itemListElement”:{“@type”:”HowToDirection”,”text”:”Next, in the automation center, click the \u201cadd custom automation\u201d button.\n”},”image”:{“@type”:”ImageObject”,”inLanguage”:”en-US”,”url”:”https:\/\/www.cloudwards.net\/wp-content\/uploads\/2024\/08\/add-custom-automation.png”}},{“@type”:”HowToStep”,”name”:”Choose the First Parameter”,”position”:3,”url”:”https:\/\/www.cloudwards.net\/monday-com-recurring-tasks\/#choose-the-first-parameter”,”itemListElement”:{“@type”:”HowToDirection”,”text”:”Next, you\u2019ll tell monday.com what needs to happen when a specific event takes place. For this example, we need to specify that every week at 1 p.m. on Monday, a 30-minute meeting will take place. Click the \u201cwhen this happens\u201d button and select \u201cevery time period\u201d from the menu.\n”},”image”:{“@type”:”ImageObject”,”inLanguage”:”en-US”,”url”:”https:\/\/www.cloudwards.net\/wp-content\/uploads\/2024\/08\/when-this-happens.png”}},{“@type”:”HowToStep”,”name”:”Choose the Frequency”,”position”:4,”url”:”https:\/\/www.cloudwards.net\/monday-com-recurring-tasks\/#choose-the-frequency”,”itemListElement”:{“@type”:”HowToDirection”,”text”:”Next, click the \u201cevery time period\u201d button and then choose the frequency of your meeting. We will select \u201cweekly\u201d and then \u201cevery one week at 13:00 p.m.\u201d Then, click the \u201ccreate automation\u201d button.\n”},”image”:{“@type”:”ImageObject”,”inLanguage”:”en-US”,”url”:”https:\/\/www.cloudwards.net\/wp-content\/uploads\/2024\/08\/every-time-period.png”}},{“@type”:”HowToStep”,”name”:”Choose an Action”,”position”:5,”url”:”https:\/\/www.cloudwards.net\/monday-com-recurring-tasks\/#choose-an-action”,”itemListElement”:{“@type”:”HowToDirection”,”text”:”The next step is to tell monday.com what to do. Click the \u201cthen do this\u201d button and select the \u201ccreate item\u201d option from the menu.\n”},”image”:{“@type”:”ImageObject”,”inLanguage”:”en-US”,”url”:”https:\/\/www.cloudwards.net\/wp-content\/uploads\/2024\/08\/create-item.png”}},{“@type”:”HowToStep”,”name”:”Define the Item”,”position”:6,”url”:”https:\/\/www.cloudwards.net\/monday-com-recurring-tasks\/#define-the-item”,”itemListElement”:{“@type”:”HowToDirection”,”text”:”Next, click the \u201can item\u201d option and then define the item options. You can choose the task’s start status, who is assigned to the item, the item\u2019s name, its budget and more.\n”},”image”:{“@type”:”ImageObject”,”inLanguage”:”en-US”,”url”:”https:\/\/www.cloudwards.net\/wp-content\/uploads\/2024\/08\/monday-item.png”}},{“@type”:”HowToStep”,”name”:”Create the Automation”,”position”:7,”url”:”https:\/\/www.cloudwards.net\/monday-com-recurring-tasks\/#create-the-automation”,”itemListElement”:{“@type”:”HowToDirection”,”text”:”The final step is confirming the automation. To do this, click the \u201ccreate automation\u201d button.\n”},”image”:{“@type”:”ImageObject”,”inLanguage”:”en-US”,”url”:”https:\/\/www.cloudwards.net\/wp-content\/uploads\/2024\/08\/monday-create.png”}},{“@type”:”HowToStep”,”name”:”Manage the Automation”,”position”:8,”url”:”https:\/\/www.cloudwards.net\/monday-com-recurring-tasks\/#manage-the-automation”,”itemListElement”:{“@type”:”HowToDirection”,”text”:”After you create the automation, the recurring task will be visible in the automation center. From here, by clicking the three dots next to the event, you can edit the recurring task, save it as a template, delete the automation and more.\n”},”image”:{“@type”:”ImageObject”,”inLanguage”:”en-US”,”url”:”https:\/\/www.cloudwards.net\/wp-content\/uploads\/2024\/08\/manage-automations.png”}}]}
How to Create a Recurring Group
Now that we have discussed how to create a recurring item, we’ll discuss creating recurring groups. Recurring groups can be useful when you need to create a new group of tasks for every new week or month.
For example, if you only work on one new marketing campaign each month, instead of manually creating a series of tasks for the campaign, you can have monday.com automatically create the tasks for you at the start of each month. Follow the steps below to create a recurring group.
- Create a New Automation
To get started, click the “automate” button at the top of your monday.com workspace to enter the automation center.

- Add an Automation
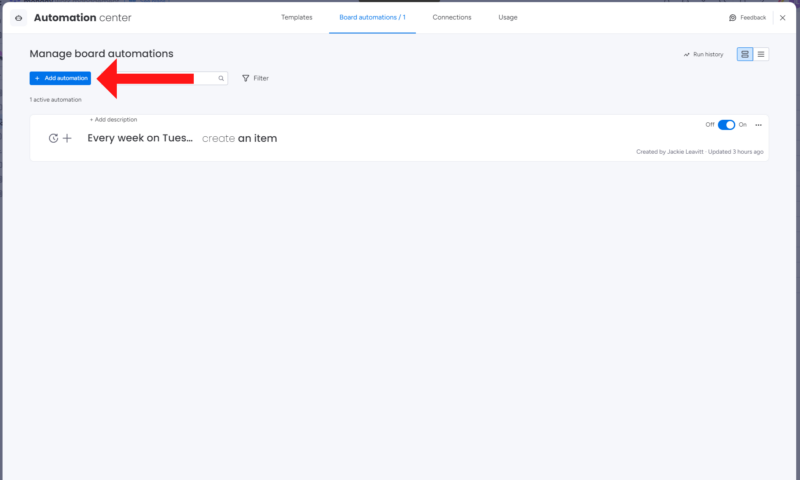
Next, click the “add automation” button at the top left of the automation center.
- Add the First Automation Parameter
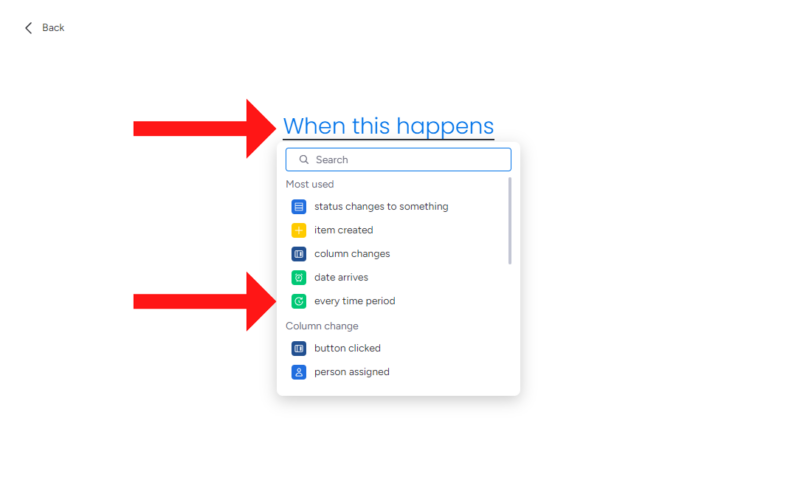
Click the “when this happens” button and select the “every time period” option.
- Choose the Time Period
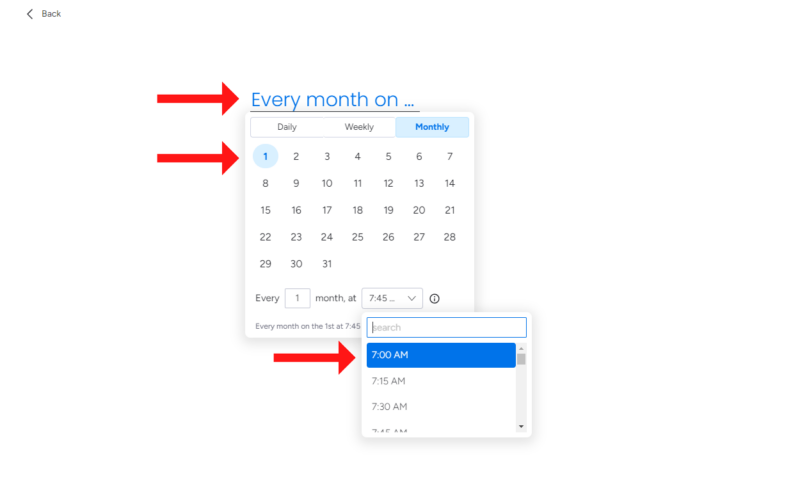
Next, click the “when this happens” option again, and then choose when you want the recurring group to be created. For this example, we’ll select the first of every month at 7 a.m.
- Add the Second Automation Parameter
Click the “then do this” button and select the “duplicate group” option.
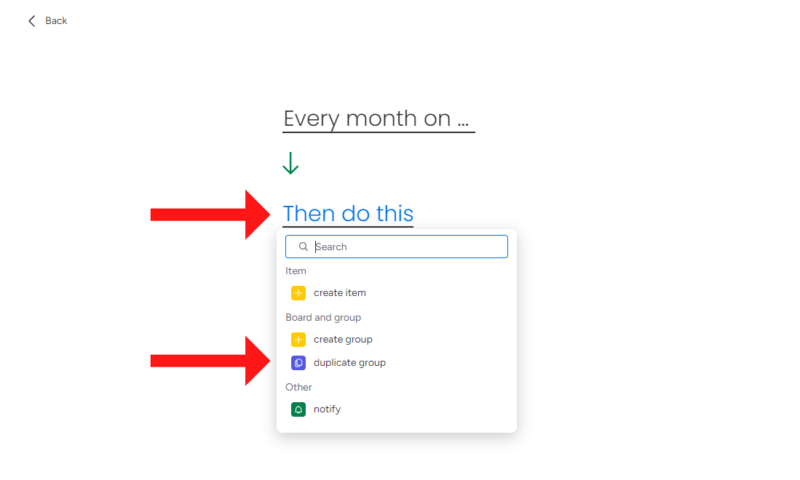
- Select Which Group to Duplicate
The next step is to choose which group to duplicate. To do this, click the “group” option and then click on the group you want to duplicate. In this example, we only have one group, so we’ll select April.
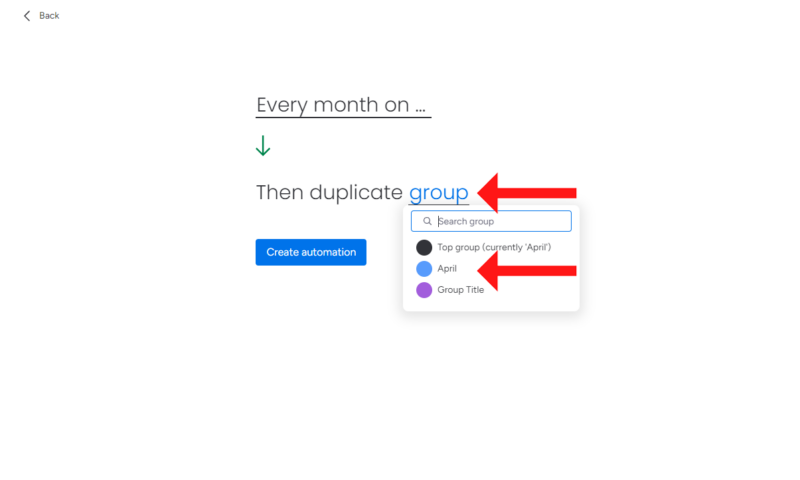
- Finish the Automation Recipe
Click the “create automation” button to add the automation recipe to your workspace.
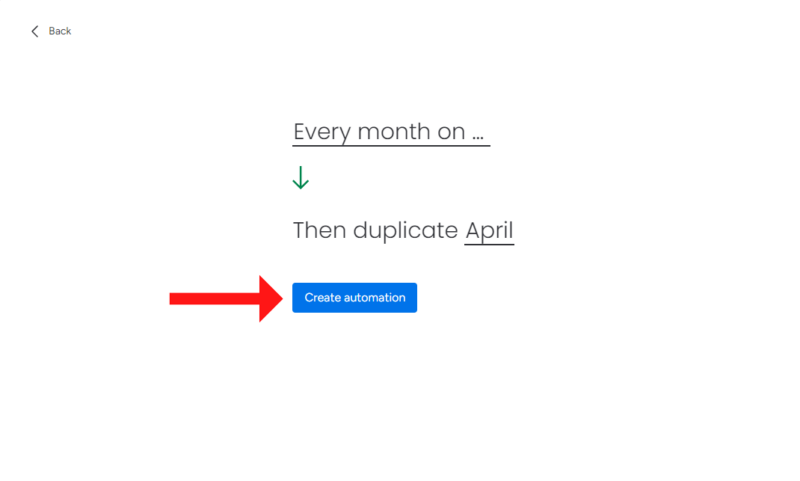
- View the Recurring Group Automation
Once you have completed the steps above, your recurring group automation will be added to the automation center. Now, at the start of every month at 7 a.m., a new campaign group will be created automatically.
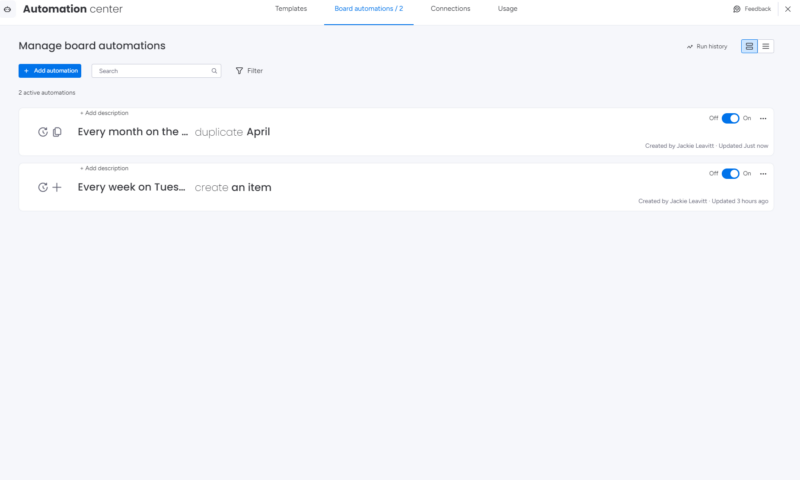
How to Create Recurring Notifications
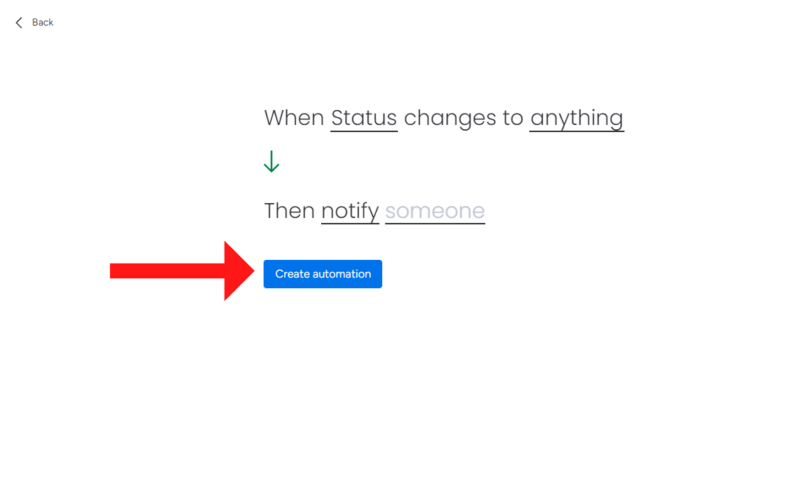
In addition to creating new events and recurring groups, you can also create notifications, or regular reminders, to run reports or to help you see task status changes. You can also set notifications to alert you when a due date is approaching. For this example, we’ll create a simple notification that will alert us when a team member changes the status of any task.
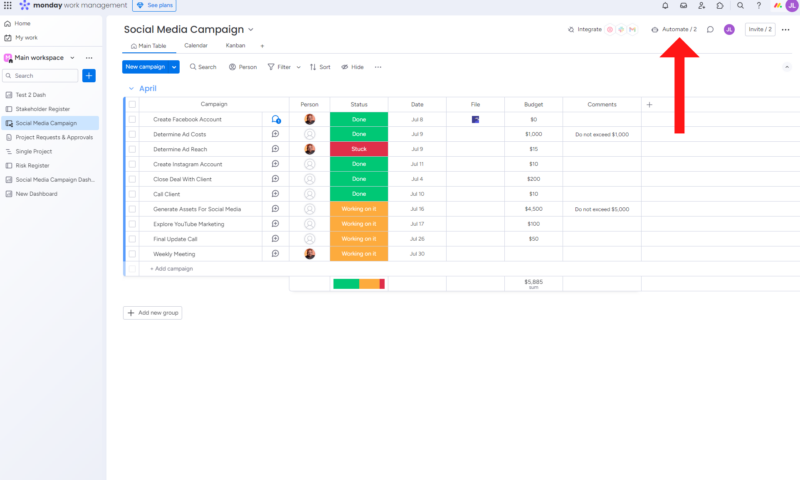
- Enter the Automation Center
While in your workspace, click the “automate” button to enter the automation center.
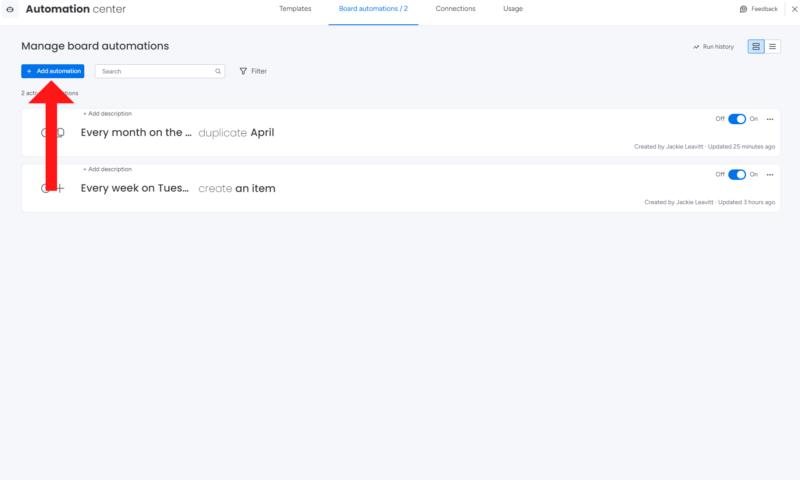
- Add a New Automation
While in the automation center, click the “add automation” button.
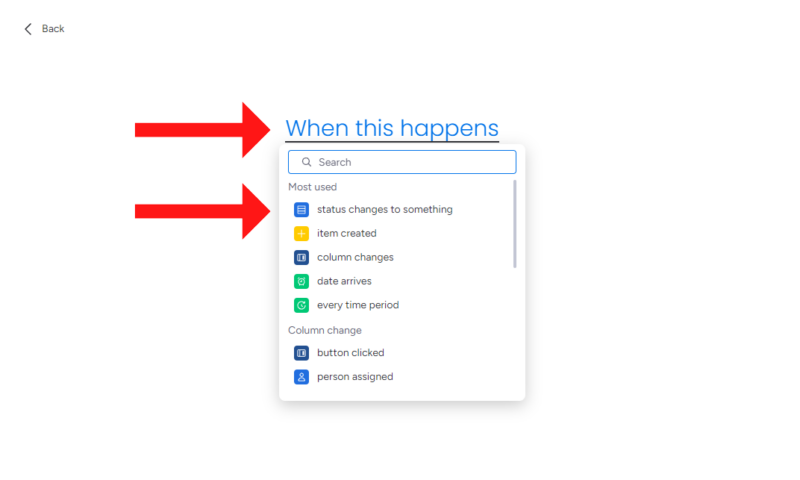
- Choose Notifications
Next, click the “when this happens” button and select the “status changes to something” option.
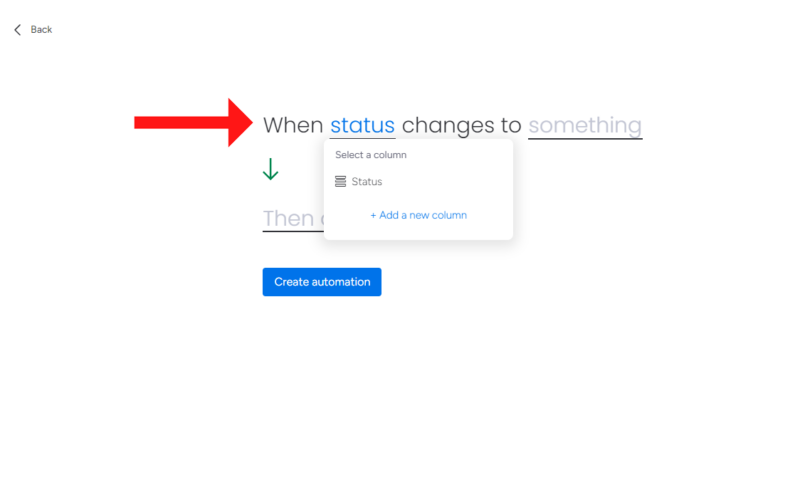
- Choose the First Notification Parameter
Next, click the “status” option and select “status.”
- Pick the Required Status for Notification
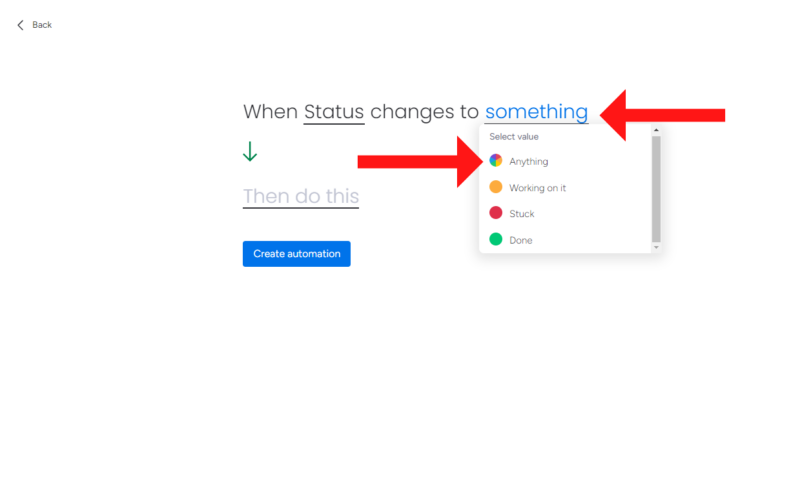
Click the “something” option, and from the drop-down menu, choose a status type to be notified about. You can select a specific status or choose “anything” to be notified about all status changes. For this example, we’ll choose the “anything” option.
- Select “Notify”
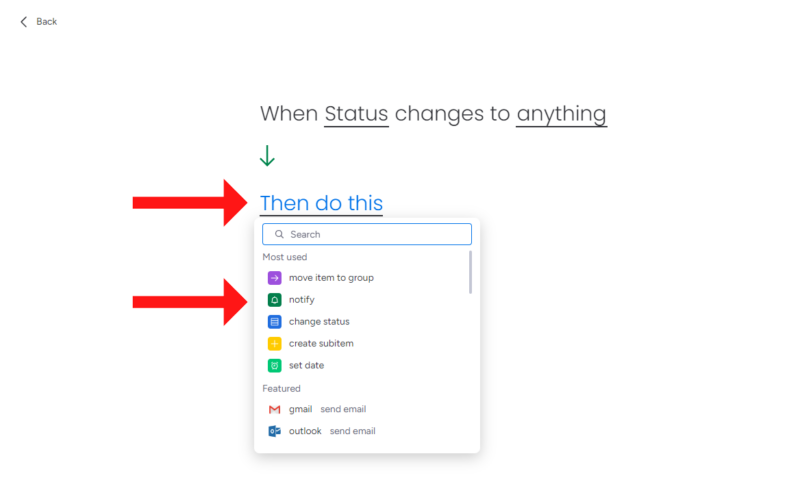
For the next step, you’ll need to click “then do this” and then select the “notify” option.
- Set the Notification Message
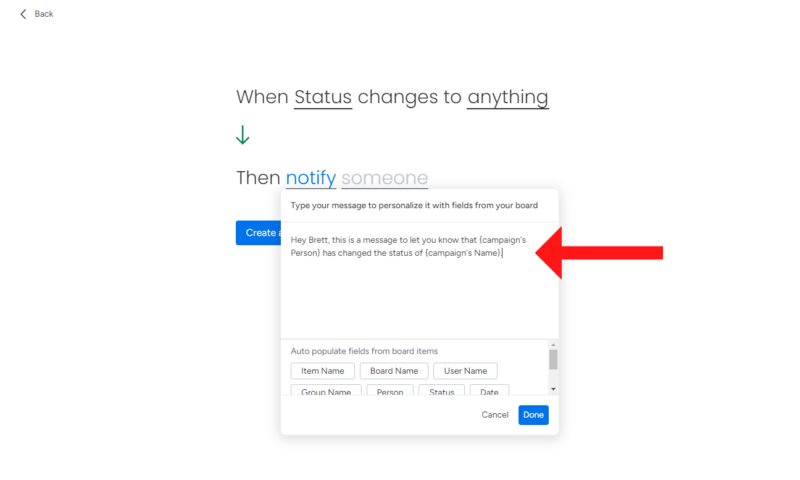
Next, click the “notify” option to open the message customization menu. Here, you can write a quick message notifying the intended recipient of the status change.
- Select the Message Recipient
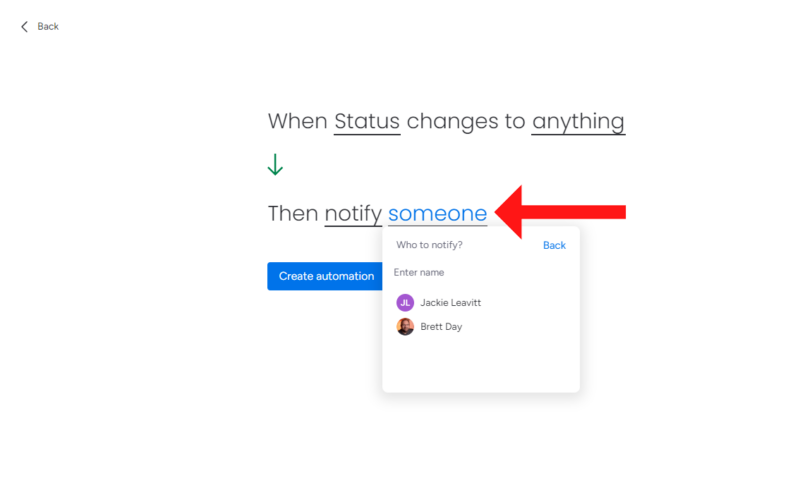
Click the “someone” button and select the team member who needs to be notified of the status change.
- Create the Notification Automation
Lastly, click the “create automation” button to add the recurring notification to your automation center. Now, whenever a status for any task is changed, the selected person will receive an email alerting them about the change.
Final Thoughts
Creating recurring events, groups and notifications on monday.com is incredibly easy. Repeating tasks and other features can save you time, which means automations shouldn’t be overlooked, especially if you’re managing complex projects. If you follow this guide, you can quickly free up time and potentially save money. That’s a huge win in our book.
Have you used recurring tasks to help you navigate projects? Which tasks or repetitive events do you automate? Do you find automations grant you more control during projects? Let us know in the comments. If you decide monday.com isn’t for you, check out our monday.com vs Zoho Projects guide to learn about Zoho’s automations. Thanks for reading.
FAQ: monday.com Recurring Tasks
-
Yes, you can set recurring tasks on monday.com. You can create custom automations for recurring tasks or use premade recipes.
-
To set up a recurring task on monday.com, visit the automation center and choose the “add automation” option. Then, you can simply configure the recurring tasks or use a premade recipe.
-
You can create recurring tasks that automatically generate daily, weekly, monthly or yearly.
-
To edit a recurring task, a monday.com user must visit the automation center, click the three dots next to the task they wish to edit and select “edit automation.”
{“@context”:”https:\/\/schema.org”,”@type”:”FAQPage”,”mainEntity”:[{“@type”:”Question”,”name”:”Can You Set Recurring Tasks on monday.com?\t”,”acceptedAnswer”:{“@type”:”Answer”,”text”:”
Yes, you can set recurring tasks on monday.com. You can create custom automations for recurring tasks or use premade recipes.\n”}},{“@type”:”Question”,”name”:”How Do I Set Up Recurring Tasks?\t”,”acceptedAnswer”:{“@type”:”Answer”,”text”:”
To set up a recurring task on monday.com, visit the automation center and choose the \u201cadd automation\u201d option. Then, you can simply configure the recurring tasks or use a premade recipe.\n”}},{“@type”:”Question”,”name”:”How Often Can I Create a Recurring Task in monday.com?\t”,”acceptedAnswer”:{“@type”:”Answer”,”text”:”
You can create recurring tasks that automatically generate daily, weekly, monthly or yearly.\n”}},{“@type”:”Question”,”name”:”How Do I Edit a Recurring Task in monday.com?”,”acceptedAnswer”:{“@type”:”Answer”,”text”:”
To edit a recurring task, a monday.com user must visit the automation center, click the three dots next to the task they wish to edit and select \u201cedit automation.\u201d\n”}}]}
The post How to Create monday.com Recurring Tasks in 2024 appeared first on Cloudwards.

