Key Takeaways: How to Use Egnyte
- Egnyte gives administrators many settings and features to customize the service to their teams’ needs.
- Egnyte has a desktop app for Windows and Mac. It also has a dedicated Mac desktop app called Egnyte Desktop App Core.
- The reports and audit feature gives you granular and analytical information on all accounts connected to your drive.
Egnyte is a cloud storage platform that provides business file-sharing and collaboration tools. Once you become familiar with the interface and how to work with Egnyte, it’s easy to use. However, getting started can feel a bit daunting to some. Our guide on how to use Egnyte covers the basics of the service.
Even if you’re an Egnyte power user, we have a few tips and tricks to share here. User and group management is a significant feature of Egnyte, as are settings and reporting. File sharing, security and privacy all help Egnyte top the list of best cloud storage for businesses.
-
06/10/2023 Facts checked
We rewrote this article to show you how to use the basics of Egnyte.
What Is Egnyte?
Egnyte is one of the most customizable business-centric cloud storage options, giving administrators the flexibility to create teams and determine storage allotments. Additionally, Egnyte’s settings provide perhaps the most customizable business cloud storage experience.
For as much freedom as Egnyte gives account holders, it’s not the easiest for first-time users. Additionally, the sheer amount of information displayed and the options available can feel a little overwhelming. Our Egnyte review takes a deeper dive into the platform.
Getting Started With Egnyte
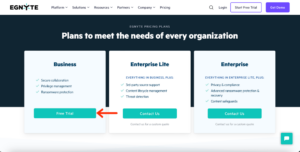
For most, the first step is to take advantage of Egnyte’s free 15-day trial for its Business plan. If you’re sure Egnyte is your platform of choice and need one of its Enterprise plans, you’ll need to contact the sales department. Otherwise, the free trial is the way to go.
Signing Up For Egnyte
Getting started with Egnyte begins by signing up for its free Business plan trial.
- Sign Up for the Free Trial
The easiest way to find the free trial is to navigate to the pricing page. Then, click the “free trial” button under the Business plan to get started.

- Enter Your Information
Enter your information into the form. You will need a business email address, as Egnyte doesn’t accept personal emails like Gmail or Outlook. If you need a free business email, check out our best business email guide.

{“@context”:”https:\/\/schema.org”,”@type”:”HowTo”,”name”:”Signing Up For Egnyte”,”description”:”These step-by-step instructions show how to sign up for a free trial with Egnyte.\r\n”,”totalTime”:”P00D01M00S”,”supply”:0,”tool”:0,”url”:”https:\/\/www.cloudwards.net\/egnyte-connect-guide\/#signing-up-for-egnyte”,”image”:{“@type”:”ImageObject”,”inLanguage”:”en-US”,”url”:”https:\/\/www.cloudwards.net\/wp-content\/uploads\/2023\/06\/How-to-Use-Egnyte-Guide.png”},”step”:[{“@type”:”HowToStep”,”name”:”Sign Up for the Free Trial”,”position”:1,”url”:”https:\/\/www.cloudwards.net\/egnyte-connect-guide\/#sign-up-for-the-free-trial”,”itemListElement”:{“@type”:”HowToDirection”,”text”:”The easiest way to find the free trial is to navigate to the pricing page. Then, click the \u201cfree trial\u201d button under the Business plan to get started.\n”},”image”:{“@type”:”ImageObject”,”inLanguage”:”en-US”,”url”:”https:\/\/www.cloudwards.net\/wp-content\/uploads\/2023\/06\/egn-free-trial.png”}},{“@type”:”HowToStep”,”name”:”Enter Your Information”,”position”:2,”url”:”https:\/\/www.cloudwards.net\/egnyte-connect-guide\/#enter-your-information”,”itemListElement”:{“@type”:”HowToDirection”,”text”:”Enter your information into the form. You will need a business email address, as Egnyte doesn\u2019t accept personal emails like Gmail or Outlook. If you need a free business email, check out our best business email guide.\n”},”image”:{“@type”:”ImageObject”,”inLanguage”:”en-US”,”url”:”https:\/\/www.cloudwards.net\/wp-content\/uploads\/2023\/06\/egn-free-trial-form.png”}}]}
How Do I Install Egnyte on My Desktop?
The Egnyte desktop app gives you access to your account data on your computer. Follow these steps to download.
- Open the “App & Integrations” Tab
While in your account, click on the “apps & integrations” tab. You can scroll down the page or click the “Egnyte apps” checkbox.

- Choose Your Desktop App
Windows and Mac users can choose the Egnyte desktop app. Mac users can download the desktop app core for Mac instead, a desktop app designed specifically for Mac computers.

- Add Your Drive
After you install and open the Egnyte desktop app of your choice, you’ll need to add a drive using your Egnyte connect account. This is the same as logging in. You will need your username, password and Egnyte domain address.

Installing Egnyte on Mobile
Egnyte lets you access your files and folders on the go with its mobile app, which functions similarly to the web interface. It also supports saving copies of photos or videos taken while using the app.
- Open the App Store
Depending on your device, open the Apple app store, Google Play store or Amazon app store. Search for “Egnyte” and download the app.

- Log In to the App
Like the Egnyte desktop app, you’ll need your username, password and the file server domain name. Once you enter this information, you can access your Egnyte account on your mobile device.

Managing Users on Egnyte
Egnyte gives administrators and power users plenty of agency and accessibility to configure accounts. This is especially true with regards to managing teams and users. There are four types of users: admins, power users, standard users and service accounts.
- Admins have the most accessibility and customization options. They can create all user types, including other admins. About the only thing an admin can’t do is access a user’s private folder.
- Power users can add standard users and other power users, and have plenty of flexibility with team management and setting folder permissions.
- Standard users have the least accessibility and can only work with folders or files assigned to them.
- Service accounts are specific to app creation users.
Adding New Accounts
To add new users to a business account, follow the steps below.
- Add New Account
From the “settings” tab, click “users and groups.” In the upper-right corner, click “add new account.”

- Choose Account Type
Select from either “administrator,” “power user,” “standard” or “service” account types. Your current account type determines which kind of new account you can add.

Change Account Type
Current users aren’t locked into an account type or role, as administrators can change the type of account. Here’s how to do it.
- Choose Account
Account type changing is reserved mainly for admins. To change, select the current user whose account type you want to alter by clicking the “details” button next to the name.

- Change Access Level
Click the “profile” tab and on the right, click “change user type.” From the dropdown menu, choose the new account type.

Managing Groups
Managing groups works similarly to managing users. Admins and power users can add and manage groups.
- Add Groups
From the “groups” tab, click “add group” in the upper right. In the form field, give the group a name and click “add group.”

- Manage Groups
Hovering over a group name gives you three options: “details,” “rename” and “delete.” Rename and delete are exactly what they sound like. Clicking “details” lets you add users to the group or manage group owners.

File and Folder Management
Each Egnyte account comes with a “shared” folder and a “private” folder (typically the user’s name). The shared folder is the parent folder; you can only create additional folders within the shared folder. Also, you can’t upload files directly to the shared folder. If you are familiar with Windows file explorer, Egnyte’s folder structure will feel familiar.
Creating or Uploading Folders
Creating or uploading folders starts from the main account page.
- Create a Folder
From the “files” tab, open the “shared” folder and click on the “create” dropdown menu.

- Select Folder Option
Choose the “folder” option, and give your folder a name. Then click “create.”

- Upload Folder(s)
If you want to upload a folder, click the “upload” option next to the “create” dropdown menu. Click the “choose file(s)” button from the pop-up page or drag and drop folders directly. You can upload more than one folder if needed.

Sharing Folders
Egnyte lets you share folders using several different options. We’ll walk you through them below.
- Choose a Folder
First, select any connected folder or subfolder you want to share by hovering over it and clicking the “link” icon, or by selecting the checkbox and hovering over the “share” option in the menu.

- Select Sharing Method
You have four share options: “manage permissions,” “share folder link,” “request files from others” or “copy direct link.” The “share folder link” option creates a link you can email directly or copy and paste where needed. The “copy direct link” option allows you to send a direct link to people who already have access.

- Link Permissions
If you choose to share the folder with a link, you can adjust the settings by clicking “change link options.” You can determine who can access the link, add a password or set a link expiration date.

Creating or Uploading Files
Creating or uploading files works the same way as with folders.
- Creating New Files
You can create a new file within any folder except the “shared” folder by clicking on the “create” dropdown menu. You could see Google Workspace or MS Office file options depending on your integrations.

- Upload Files
To upload files from your device, click the “upload” option next to the “create” dropdown menu. You can choose specific files from your computer or use the drag-and-drop feature to upload files.

Sharing Files
Sharing files happens by creating a link or embedding a link in connected apps.
- Choose a File(s)
Find the file you want to share. Either hover over the file and click the link icon, or select the checkbox and choose “share” from the menu. Note that you can share multiple files at once.

Adding Tasks
Egnyte lets account holders add tasks and create workflows. Here are the steps involved.
- Create a Workflow
From any file, click the checkbox. From the menu, choose “workflows.” This will pull up a file preview with options on the right. Click the “create new” button to add a new workflow.

- Select Workflow Type
From the pop-up window, you can choose from two workflow types: “to do” and “approval.” “To do” workflows can be completed, while “approval” workflows can be approved or rejected. Choosing either type expands the menu.

- Assign Task
After choosing a task type, a new form expands. You can give the task a name, add more details in the description box and assign it to members. Some fields are required, such as adding a due date. When done, click “create.”

Completing Tasks
Tasks assigned to or by you have a dedicated tab for easy access.
- Tasks and Workflow Tab
From the main screen, open the “tasks & workflow” tab from the left sidebar. The first view shows tasks assigned to you. The second view shows the workflows you’ve created. Choose the file you want to work on as a task.

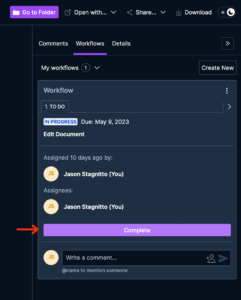
- Complete or Approve Tasks
Once you open the file/task, you can either complete a to-do task or approve or reject an approval task.

Adding Comments
Comments are an integral part of workflows and tasks. You can put comments directly into workflows or add comments directly to files.
- Add Comments to Workflows/Tasks
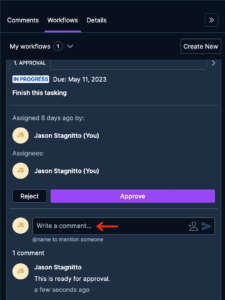
You’ll see the option to add comments under each task from the file preview. Type your message into the comments box and click the send icon to add comments.

- Add Comments to Files
From the main account page, you can add comments to any file. Clicking the small messaging icon opens the file preview directly to the “comments” tab. You don’t need to work with a task or workflow to add comments to a file.

File Versions
Egnyte makes it easy to manage, revert or download older file versions.
- Choose a File
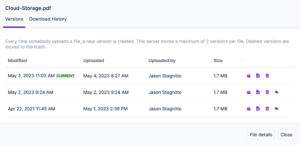
Find a file you want to view the older versions of. Click the checkbox, and from the right-side menu, choose “versions and history.”

- Choose an Option
All versions kept of the given file will show up on a pop-up page. You have four options for each older version: “download version,” “copy version ID,” “remove version” and “make current.” You won’t see “make current” for the current version, but you will have the other three options.

Egnyte Reporting and Auditing
Reports provide granular information on all the accounts connected to your team. Additionally, you can run audits in many areas to get a more analytical view of usage.
Running Reports
Once you navigate to the “reports” tab, you’ll see a dashboard that contains account analytics. Below, we’ll pull an example report.
- Choose a Report
You’ll see the dashboard first. To run a report, choose from the below options, such as “folders and files.”

- Run a Report
Sticking with the “folders and files” submenu, click “folder size report.” The dropdown option lets you choose the selected folder only or the selected folder and any subfolders. If you choose the subfolders option, you can determine how many levels to drill down. Click on the folder where you want to run a report, then click “submit.” Egnyte creates a dedicated folder for all the reports you run.

Running Audits
Audits are another report type that provides analytical data for different account areas. Here’s how to run them.
- Open the Audit Options
Audit reports are the last option on the left side of the “reports center” page. Click the dropdown arrow to see all the audit report choices.

- Run Audit Report
Make a selection from the available choices. For example, click “file reports.” Click “new report” and fill out the information on the screen. You must give the report a name; you can then determine the date range and make choices based on items like “actions,” “folders” and “users.” When ready, click “submit.” Once the audit report is generated, you can click the name to see the detailed information.

Egnyte Integrations & Add-ons
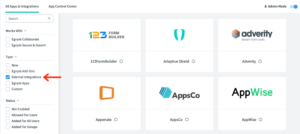
Egnyte has plenty of native apps and a host of third-party integrations. All options are found in the “apps & integrations” menu.
- Filter Options
You can narrow down the options by clicking the checkboxes next to some filter choices, such as “external integrations.” Alternatively, you can use the search bar to see if a specific app integration is supported.

- Select Integration
Once you find the app or integration you want, hover over the box and click the “view details” or “enable integration” button. The “view details” option opens a page with more information. The “enable integration” button opens a window that allows you to enable the integration for some or all users.

App Control Center
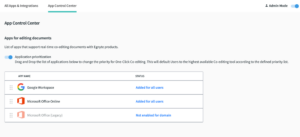
The app control center, despite its name, is only for integrating either Google Workspace or Microsoft Office.
- Open the App Control Center
Click the tab at the top of the screen called “app control center.”

- Enable Integrations
Choose to enable Google Workspace or Microsoft Office. Hover over the desired integration and click the “settings” button. Choose which groups or users are allowed to use the integration. You’ll also have the option to set one or the other as the default app for editing.

Uninstalling Egnyte App
If you decide Egnyte is no longer needed or want to remove a specific drive, you can do so in a few easy steps.
Removing a Drive
Follow the following steps to remove a drive but keep the app installed.
- Open the Desktop App
From either a Mac or Windows computer, open the desktop app by clicking the Egnyte icon. Then, click on the gear icon and click “drives.”

- Disconnect or Remove a Drive
Click the three dots icon to the right of the drive you want to disconnect or remove. Choose either “disconnect” to disable the drive (but not remove it) or “remove” to take the drive off your desktop account.

Remove the Desktop App
If you no longer need the Egnyte desktop app, you can uninstall it in a few steps.
- Uninstall the Desktop App
Depending on your operating system, find the Egnyte app. On Windows, from the “start” option, click “all apps,” scroll down to “Egnyte connect” and click “uninstall Egnyte desktop app.” On a Mac, open Finder and navigate to “applications.” Scroll to the Egnyte app, right-click and select “move to trash.”

Remove the Mobile App
It’s just as easy to remove the mobile app from your device.
Egnyte Alternatives
Egnyte isn’t the only game in town, as with most cloud storage products. Often, Egnyte gets compared to MS SharePoint. However, as we cover in our Egnyte vs Sharepoint article, the comparison isn’t entirely justified.
It’s better to look at Box for a fairer comparison. We cover the service in detail in our Box review. If you want to see how Egnyte and Box stack up against each other, check out our Egnyte vs Box article.
Other comparable competing services include OneDrive and Dropbox Business. All three options have different value propositions. We have the details in our OneDrive review and our Dropbox Business review. Additionally, we compare these services against Egnyte (Egnyte vs OneDrive and Egnyte vs Dropbox Business) to help you better understand which is right for you.
Egnyte is an expensive business cloud storage service, so it’s important to note that there are more affordable options. Two such choices are Sync for Teams and Zoho WorkDrive. Sync for Teams offers excellent privacy and true private encryption for all accounts. Zoho WorkDrive has a library of native apps and plenty of third-party connections.
-
1
- :
- : 150 GB
- :
- :
- :
- :
-
2
- :
- : 100 GB
- :
- :
- :
- :
$5 / month(All Plans) -
3
- :
- : 50 GB
- :
- :
- :
- :
-
4
- :
- : 50 GB
- :
- :
- :
- :
-
5
- :
- : Unlimited GB
- :
- :
- :
- :
Final Thoughts
It could take a while to become familiar with Egnyte, as it takes a slightly different approach to file structure than some competitors. However, combined with its flexibility and customization, especially for administrators, Egnyte is a solid option for many businesses.
Do you find it difficult to use Egnyte? If so, did this how-to article help? Did we miss a critical area regarding its features? Let us know in the comments section below. Thanks for taking the time to read our article.
-
Egnyte offers a desktop app that works with either Windows or Mac. For Macs, Egnyte has a dedicated app called Egnyte Desktop App Core. You can download either from your account’s “apps & integrations” tab. Once you connect your drive, you can access your folders and files from your computer.
-
You can click the “create” button to create a new folder from either the “shared” folder or from your account’s “private folder.”
-
Egnyte has a dedicated user and group management section within your account’s “settings” tab. The “users & groups” dropdown allows you to add new users and groups, as well as manage existing users and groups.
{“@context”:”https:\/\/schema.org”,”@type”:”FAQPage”,”mainEntity”:[{“@type”:”Question”,”name”:”How Do I Use Egnyte on My Desktop?”,”acceptedAnswer”:{“@type”:”Answer”,”text”:”
Egnyte offers a desktop app that works with either Windows or Mac. For Macs, Egnyte has a dedicated app called Egnyte Desktop App Core. You can download either from your account’s \u201capps & integrations\u201d tab. Once you connect your drive, you can access your folders and files from your computer.\n”}},{“@type”:”Question”,”name”:”How Do I Create a New Folder in Egnyte?”,”acceptedAnswer”:{“@type”:”Answer”,”text”:”
You can click the \u201ccreate\u201d button to create a new folder from either the \u201cshared\u201d folder or from your account\u2019s \u201cprivate folder.\u201d\n”}},{“@type”:”Question”,”name”:”How Do I Manage Users in Egnyte?”,”acceptedAnswer”:{“@type”:”Answer”,”text”:”
Egnyte has a dedicated user and group management section within your account’s \u201csettings\u201d tab. The \u201cusers & groups\u201d dropdown allows you to add new users and groups, as well as manage existing users and groups.\n”}},{“@type”:”Question”,”name”:”How Do I Share Files on Egnyte?”,”acceptedAnswer”:{“@type”:”Answer”,”text”:”
Creating a shared link is the easiest way to share files in Egnyte. You can customize the link settings, including adding a password or setting an expiration date.\n”}}]}
The post How to Use Egnyte in 2023: Guide for Getting Started appeared first on Cloudwards.


