When you sign up for a virtual private network (VPN) subscription with a provider like ExpressVPN or NordVPN, you’re paying a broker to create a secure VPN connection for you. However, if you’re a little more tech-savvy or have particular needs, you might want to learn how to use Tunnelblick — an OpenVPN macOS interface that connects you without a provider.
Tunnelblick is a unique open-source program that lets you connect directly to OpenVPN servers, cutting out the VPN provider middleman. Using Tunnelblick is like cooking at home instead of going out to a restaurant: the same ingredients, and the same end goal, but you sacrifice convenience for the sake of greater control.
Key Takeaways: Using Tunnelblick on MacOS
- Tunnelblick is a graphic interface that lets macOS users connect to VPN servers without using a VPN provider’s app. It has fewer features than a service like ExpressVPN, but offers more control.
- To connect, you’ll need an OpenVPN configuration file. You can get these from your employer, from VPN providers or set them up yourself.
- Drag the configuration file to the Tunnelblick icon in your menu bar to install it. From there, you can connect to it using the dropdown menu.
In this article, we’ll explain what Tunnelblick is, why you might want it and how you can use it to connect to, and disconnect from, OpenVPN servers. We hope you enjoy gaining a new command of this alternative approach to VPN security.
-
Yes. Tunnelblick can only work with an OpenVPN configuration file, but grants the same encrypted tunnel as any other use of the OpenVPN protocol.
-
If your VPN is connected, the active Tunnelblick VPN configuration will be listed in the dropdown menu, and the text on the status window will turn green.
-
Tunnelblick is not available for Windows, but Windows users can use the OpenVPN or WireGuard apps to set up manual connections.
-
As long as the file is in .ovpn, .conf or .tblk format, just click and drag it to the logo into your menu bar. It’s that easy!
How to Use Tunnelblick: What Is Tunnelblick?
Tunnelblick is a piece of software that lets you connect to a VPN server if you already know some specific information about it. The data required to locate and connect to a VPN server is known as a VPN configuration.
Tunnelblick can only connect to servers configured with the OpenVPN protocol (if you prefer WireGuard, that protocol has its own client you can use). The flipside is that you can connect to any OpenVPN server as long as you know the configuration. These configurations are stored in files that you can import directly into Tunnelblick.
All you need to browse the internet with OpenVPN protection is Tunnelblick and a configuration. Once you’ve connected to a VPN server, you’ll get all the normal benefits of a VPN: an encrypted tunnel, a concealed IP address, protection on public networks and the ability to spoof your location.
Why Connect to a VPN Manually?
Why would you want to manually connect to a VPN when plenty of the best VPN providers are lining up to do it for you? A few reasons. First of all, most of those providers cost money, while Tunnelblick is totally free.
Even if you choose a free VPN service, you’ll have to trust that it has your best interests at heart and that it abides by its own privacy policy. Most of them do, but even in that best-case scenario, you’re still limited to the servers in that provider’s network. If it doesn’t have a server in a country where you need an IP address, you’re out of luck.
You can also use Tunnelblick to connect to private servers at your home or workplace. Using a VPN lets you get onto these networks securely, since nobody without the VPN configuration can gain access. Think of it as a form of two-factor authentication.
How to Install Tunnelblick
If you’ve decided you’re ready to control your own OpenVPN connection, the next step is to download and install Tunnelblick. Since you don’t have to make an account or pay anything, it’s pretty straightforward.
- Go to the Downloads Page at Tunnelblick.net
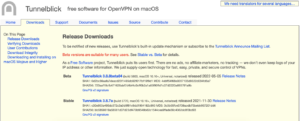
When you navigate to tunnelblick.net, you’ll see a row of tabs along the top. Click “downloads,” second from the left.

- Download the Latest Release, Then Open the .dmg File
Choose either a stable or beta release (stable releases are more thoroughly tested, but may lack fixes for some newly discovered bugs). Click the blue link to download the .dmg file. Locate the .dmg file in your browser downloads or in Finder, and double-click it.

- Double-Click the Tunnelblick Icon and Follow On-Screen Instructions
A window should appear, inviting you to double-click on the Tunnelblick icon. Double-click, grant permission if necessary and enter your password when prompted. An icon of a little gray tunnel should appear in your menu bar, indicating that the software is installed.

The latest Tunnelblick releases work on macOS 10.10 and higher. If you’re on an older version, you’ll need to scroll down on the downloads tab to find the deprecated downloads page. Older downloads are available for macOS 10.4 and up.
How to Connect to a VPN With Tunnelblick
Now that you’ve got the software active, you’ll need a Tunnelblick VPN configuration before you can connect. Tunnelblick does not have a VPN server network of its own, so you’ll need to go to another source. Here’s how to get a hold of a configuration and use it.
- Get a Configuration File
There are three main ways to get your hands on a VPN configuration. First, you can manually set up your own OpenVPN server. Second, if you’re connecting through a business network, you can get the file from your employer. Finally, you can use a server provided by a VPN service, many of which make their servers available. We’ve used a Proton VPN server for this guide.

- Drag the Configuration File Onto the Tunnelblick Icon
Locate the OpenVPN configuration file in Finder, then click and drag it onto the Tunnelblick icon in your menu bar. If it’s a .ovpn or .conf file, the program will automatically convert it to a Tunnelblick VPN configuration, then install it.

- Go Through the Remaining Dialogue Boxes
If your VPN server doesn’t belong to an existing VPN service, you may be asked to “set nameserver.” Click “set” unless you want to use a local DNS server; otherwise, you risk DNS leaks. Decide which users you want to have access to the configuration, then enter your password.

- Click on the Icon and Select a Configuration
Click the Tunnelblick icon in your menu bar, then select a Tunnelblick VPN configuration from the dropdown menu. If you’re following these instructions during your first time using Tunnelblick, there should only be one connection available.

- Enter Your OpenVPN Username and Password if Necessary
You may see a request for credentials, which you should get from your employer if you didn’t set up your own server. If you got the configuration through a VPN service provider, note that these are not the username and password to your VPN account — your account page should show a separate set of credentials from OpenVPN. Once entered, Tunnelblick should connect.

- Toggle Configuration Settings
You can access the settings page by clicking the Tunnelblick icon and selecting “VPN details.” Here, you can customize settings for each configuration, such as when it connects, what version of OpenVPN it uses and even what it does on an unexpected disconnect (you can have it cut off your internet automatically, much like a VPN kill switch).

On the other tabs, you can customize Tunnelblick’s appearance, set permissions and keyboard shortcuts, check for updates and quickly uninstall Tunnelblick (among other things).
How to Disconnect From Your VPN
While online, use the internet as normal. When you’re ready to disconnect, follow the instructions below.
You can reconnect to the same configuration using both of the same options (the status window or the menu).
How to Connect to Your VPN on Startup
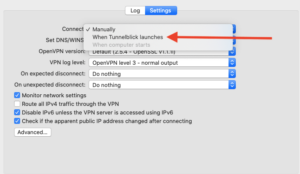
You can set Tunnelblick to connect automatically as soon as it launches. As a menu bar application, Tunnelblick always boots up as soon as your computer starts. Once it’s active, follow these steps to set up an automatic connection.
- Go to the VPN Details Window
Click on Tunnelblick in the menu bar, then select “VPN details” to see the settings page.

- Select the Configuration You Want to Automatically Connect
You’ll see a list of configurations on the left-hand side. Click the one you’d like to connect whenever you launch Tunnelblick. We’ve only got one here, but if you have more than one, click on your favorite.

While it’s technically possible to select this setting for multiple connections, Tunnelblick strongly recommends only running one configuration at a time unless you’re an expert. You can have as many configurations on your list as you’d like, however.
Final Thoughts
Tunnelblick isn’t necessary for everybody. A standard VPN service provider should work just fine for most people. However, if you know exactly what you want and are looking for a whole new level of control, mastering Tunnelblick is definitely worth your time — and as you’ve seen above, it’s surprisingly simple too.
Have you used Tunnelblick before? Got any expert tips for our readers to try? Let us know in the comments, and thanks for reading.
The post How to Use Tunnelblick in 2023: Beginners Guide to OpenVPN Connections appeared first on Cloudwards.


