Key Takeaways: Surfshark Dedicated IP
- Surfshark offers dedicated IP addresses in 14 locations across 11 countries and regions: Australia, the U.S., Canada, Italy, Hong Kong, Germany, France, Japan, the Netherlands, South Africa and the U.K.
- A Surfshark dedicated IP costs $3.75 per month, but has a 30-day money-back guarantee in case you change your mind.
- Surfshark’s dedicated IP is linked to your email, but there’s an option to delink and anonymize it.
In early June 2023, Surfshark launched a new dedicated IP feature, joining the cluster of top-tier VPNs with dedicated IP addresses. Surfshark dedicated IP addresses are an add-on, meaning you pay extra, but is it worth it? The short answer is yes — a dedicated IP address offers the benefits of a fixed IP and VPN protection.
We took Surfshark’s dedicated IP address for a spin to see how it works. In this guide, we’ll show how to buy, set up, use and anonymize a dedicated IP address on Surfshark. We’ll also highlight the pros and cons of the dedicated IP to help you make an informed buying decision.
What Is Surfshark Dedicated IP?
Surfshark’s dedicated IP is an IP address that’s exclusively yours. In addition, the IP address is fixed. In other words, you’ll always get the same IP address every time you connect to the assigned IP location. Think of Surfshark’s IP address like having a comfy seat reserved on a bus that you can use whenever you need.
On the other hand, if you opt for a Surfshark’s shared IP address, that’s akin to having no reserved seat. The provider assigns you a random IP address that hundreds of other VPN users share. The chances of getting the exact IP address the next time you connect to the same VPN server are slim.
How Much Does a Surfshark Dedicated IP Cost?
Surfshark’s dedicated IP address costs $3.75 per month. It’s an add-on feature, meaning you can’t buy a dedicated IP — you’ll have to get a Surfshark subscription first. Like Surfshark’s standard subscription, the dedicated IP address has a 30-day money-back guarantee (learn more in our Surfshark review).
Surfshark currently offers dedicated IPs in 14 locations across 11 countries and territories, as follows:
| Country: | Server Locations |
|---|---|
 U.S. U.S. |
Los Angeles, Dallas, San Jose, New York |
 U.K. U.K. |
London |
 Germany Germany |
Frankfurt |
 Netherlands Netherlands |
Amsterdam |
 Australia Australia |
Sydney |
 Italy Italy |
Milan |
 Hong Kong Hong Kong |
Hong Kong |
 Canada Canada |
Toronto |
 France France |
Paris |
 Japan Japan |
Tokyo |
 South Africa South Africa |
Johannesburg |
There are a few things to note. First, Surfshark has vowed to continue restocking the cluster of dedicated IP servers, so we expect the list to grow. Second, the available dedicated IPs are limited, meaning that purchasing a dedicated IP in some locations may be impossible.
Surfshark allows you to have one dedicated IP per account; once you choose the IP, there’s no way to change it. For this reason, choose your dedicated IP carefully, based on your needs and preferences. If you can’t decide which dedicated IP location works for you, try the regular server in the preferred location before making a decision.
Once you set up Surfshark’s dedicated IP, it becomes available automatically on Windows, Mac, iOS and Android apps linked to your account. However, you can manually connect to your dedicated IP on devices that don’t support native VPN apps, such as a router.
How to Start Using Surfshark Dedicated IP: A Beginner’s Guide
In this section, we’ll show you how to purchase, configure and anonymize the Surfshark dedicated IP address.
How to Buy and Set Up a Surfshark Dedicated IP
The first step is to purchase the dedicated IP address in your preferred location.
- Get a Surfshark Subscription
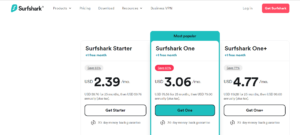
Visit Surfshark’s official website, click “get Surfshark” and choose your preferred plan. Complete the checkout process to create your Surfshark account.

- Log in to the Surfshark Web Portal
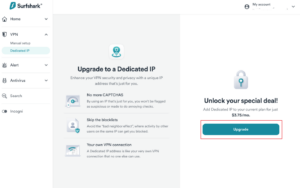
Log in to Surfshark’s web portal, select VPN, then “dedicated IP” and click “upgrade.”

- Complete the Billing
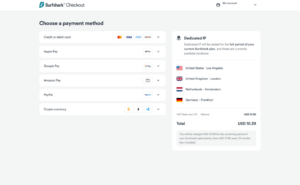
In the next window, select your payment method and check out.

- Pick Your Preferred Location
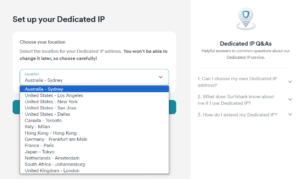
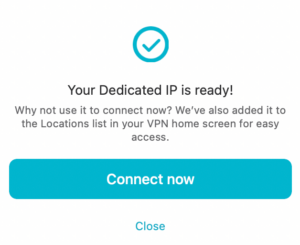
Head to your Surfshark web portal, select VPN and then dedicated IP. In the new window, pick your preferred dedicated IP location. Click “activate” to finish the setup. You’ll get a notification that your dedicated IP is ready.

- Use Dedicated IP Address
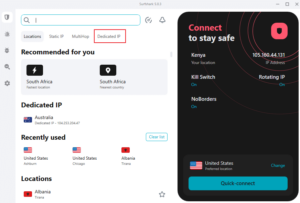
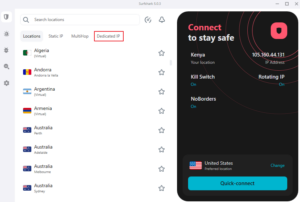
Install the Surfshark mobile or desktop VPN app. Launch the app and select “dedicated IP” to see the dedicated IP server location you configure. Surfshark also adds the dedicated IP on the home screen for quick access. Click the server location to connect.

How to Anonymize Surfshark Dedicated IP
While Surfshark’s dedicated IP offers numerous benefits (as you’ll read in a bit), it is tied to your email address. In addition, the provider knows the IP address they have assigned you, making it less private than a shared IP.
To restore privacy, Surfshark offers an anonymous dedicated IP option. With this option, you delete any data that links the dedicated IP to your email, ensuring that no one (not even Surfshark) knows your IP address.
Once you initiate this process, you can’t reverse it.
- Log in to Your Surfshark Account
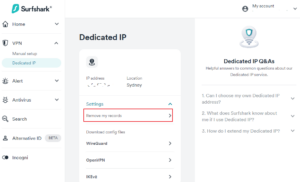
Log in to the Surfshark web portal, select VPN and click “dedicated IP.” Under the dedicated IP location, click “settings” and select “remove my records.”

- Acknowledge the Warning
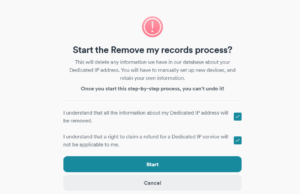
On the warning page, tick the two boxes if you accept the conditions, and click “start” to initiate records removal. Just bear in mind that once you press “start,” there’s no turning back. If you’re undecided or the conditions are unfavorable, press “cancel” to stop the process.

- Download the Dedicated IP Token
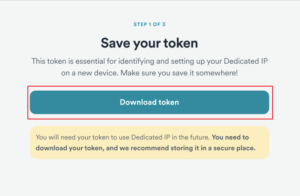
Click “download token” in the next window to download the dedicated IP token. We recommend saving the token .txt file in the cloud or on multiple devices, so you don’t lose it.

- Save the Token
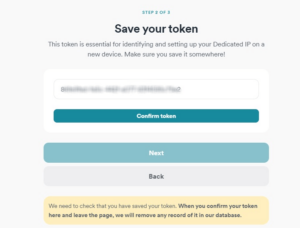
Before the download is complete, head over to the Surfshark app and copy the token ID (just below the dedicated IP). Once the download is done, paste the token in the new window and click “confirm token.” Press “next” to continue.

- Download The Configuration Files
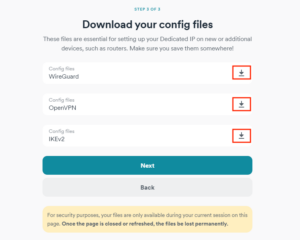
You must first confirm the dedicated IP token to be able to download the configuration files. Click the download button beside the VPN protocols (WireGuard, OpenVPN and IKEv2) config files to start downloading.

- Confirm Configuration Files Download
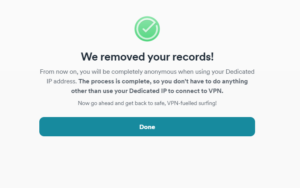
Confirm that the download is complete and click “yes, I saved it.” Once you do that, you’ll get a message confirming that your dedicated IP is anonymous.

How to Connect to an Anonymous Dedicated IP
If you had the dedicated IP set up on your devices before removing the records, you won’t have to configure it again. However, you’ll have to configure dedicated IPs on new devices manually. The steps are the same for all operating systems (Windows, Android, iOS and Mac).
Benefits of Using Surfshark Dedicated IP
If you’re considering buying a Surfshark dedicated IP address, here are some of the benefits you’ll enjoy.
Sidestep IP Blocklisting
One of the biggest risks with a shared IP is that anyone can get assigned the IP, including bad actors, as long as they have the VPN app. If one user gets the shared IP blocked by an online service, anyone else connecting to the same IP will be locked out of that service.
Let’s say a user connecting via a shared IP violates Quora or Reddit’s forum rules and the service bans them. If you connect to a VPN and the provider assigns you the same IP, you’ll not be able to access those forums.
Luckily, a dedicated IP is exclusively yours. This helps you sidestep the “bad neighbor” effect, allowing you to access online services without having to worry about IP blocklisting.
Improve Privacy With Anonymous Option
Surfshark’s dedicated IP automatic configuration leaves your IP linked to your email address, which poses a privacy risk. If a bad actor gets hold of the IP address, they could use reverse engineering to trace your email address.
Thankfully, Surfshark offers a way to anonymize the dedicated IP address. In the anonymous format, the dedicated IP address isn’t linked to your email address and Surfshark doesn’t know which dedicated IP address is yours.
Avoid Annoying CAPTCHA Requests
Websites use CAPTCHAs (Completely Automated Public Turing test to tell Computers and Humans Apart) to differentiate humans from robots or computers.
If many users connect to a website through the same IP address, the website might think the requests are from robots, serving up CAPTCHA requests for users to solve. Since the dedicated IP is exclusively yours, it shouldn’t trigger the website’s CAPTCHA system.
Access IP-Sensitive Services and Websites
Gambling, online banking and crypto trading platforms frown upon the use of VPN services. They have configured their systems to flag users logging in via different IP addresses.
The problem with shared IPs is that you rarely get a consistent IP address. If you keep connecting to the IP-sensitive website with different IPs they might detect you’re using a VPN or an anonymizer.
However, with a dedicated IP address, you can rest assured that the system won’t know you’re using a VPN. The dedicated IP is fixed, meaning you get a consistent IP address every time you access the website.
Is Surfshark Dedicated IP Available on all Surfshark Plans?
Surfshark’s dedicated IP address is an add-on feature, and it’s not bundled into any Surfshark plan. This means that to get a dedicated IP address, you must first get the standard VPN subscription. The upside is that regardless of the plan you choose, it’s easy to add the dedicated IP address for $3.75 per month.
Final Thoughts
Surfshark’s dedicated IP helps you enjoy the benefit of a unique IP address without losing VPN protection. It’s a handy feature if you need extra protection when accessing banking services, NFTs, crypto platforms or websites that block VPN users. In addition, it helps you evade annoying CAPTCHAs and the bad-neighbor effect.
Do you think Surfshark’s dedicated IP suits your needs and preferences? How do you intend to use the dedicated IP address? Does Surfshark offer a dedicated IP server in your country of choice? We’d like to hear about it in the comment section. As always, thanks for reading.
FAQ: Surfshark Dedicated IP
-
You will want a dedicated IP if you plan to use a VPN to access online banking, crypto platforms, games or any website that blocks VPN users.
-
Yes, besides dedicated IP addresses, Surfshark offers 36 static IP servers in six countries.
-
Some dedicated IPs are linked to your email address, which can pose a privacy risk. In addition, a dedicated IP costs extra.
The post How to Use Surfshark Dedicated IP in 2023 to Get a Private IP Address appeared first on Cloudwards.

