AWS Glue is a serverless data integration service that makes it simple to discover, prepare, and combine data for analytics, machine learning (ML), and application development. You can use AWS Glue to create, run, and monitor data integration and ETL (extract, transform, and load) pipelines and catalog your assets across multiple data stores.
Hundreds of thousands of customers use data lakes for analytics and machine learning to make data-driven business decisions. Data consumers lose trust in data if it is not accurate and recent, making data quality essential for undertaking optimal and correct decisions.
Evaluation of the accuracy and freshness of data is a common task for engineers. Currently, there are various tools available to evaluate data quality. However, these tools often require manual processes of data discovery and expertise in data engineering and coding.
We are pleased to announce the public preview launch of AWS Glue Data Quality. You can access this feature today without requesting any additional access in the available Regions. AWS Glue Data Quality is a new preview feature of AWS Glue that measures and monitors the data quality of Amazon S3-based data lakes and in AWS Glue ETL jobs. It does not require any expertise in data engineering or coding. It simplifies your experience of monitoring and evaluating the quality of your data.
This is Part 1 of a four-part series of posts to explain how AWS Glue Data Quality works. Check out the next posts in the series:
Getting started with AWS Glue Data Quality
|
In this post, we will go over the simplicity of using the AWS Glue Data Quality feature by:
- Starting data quality recommendations and runs on your data in AWS Glue Data Catalog.
- Creating an Amazon CloudWatch alarm for getting notifications when data quality results are below a certain threshold.
- Analyzing your AWS Glue Data Quality run results through Amazon Athena.
Set up resources with AWS CloudFormation
The provided CloudFormation script creates the following resources for you:
- The IAM role required to run AWS Glue Data Quality runs
- An Amazon Simple Storage Service (Amazon S3) bucket to store the NYC Taxi dataset
- An S3 bucket to store and analyze the results of AWS Glue Data Quality runs
- An AWS Glue database and table created from the NYC Taxi dataset
- Template: GlueDQBlog.json
- Data used: yellow_tripdata_2022-01.parquet
- Malformed data used in Section 2 of this blog: malformed_yellow_tripdata.parquet
Steps:
- Open the AWS CloudFormation console.
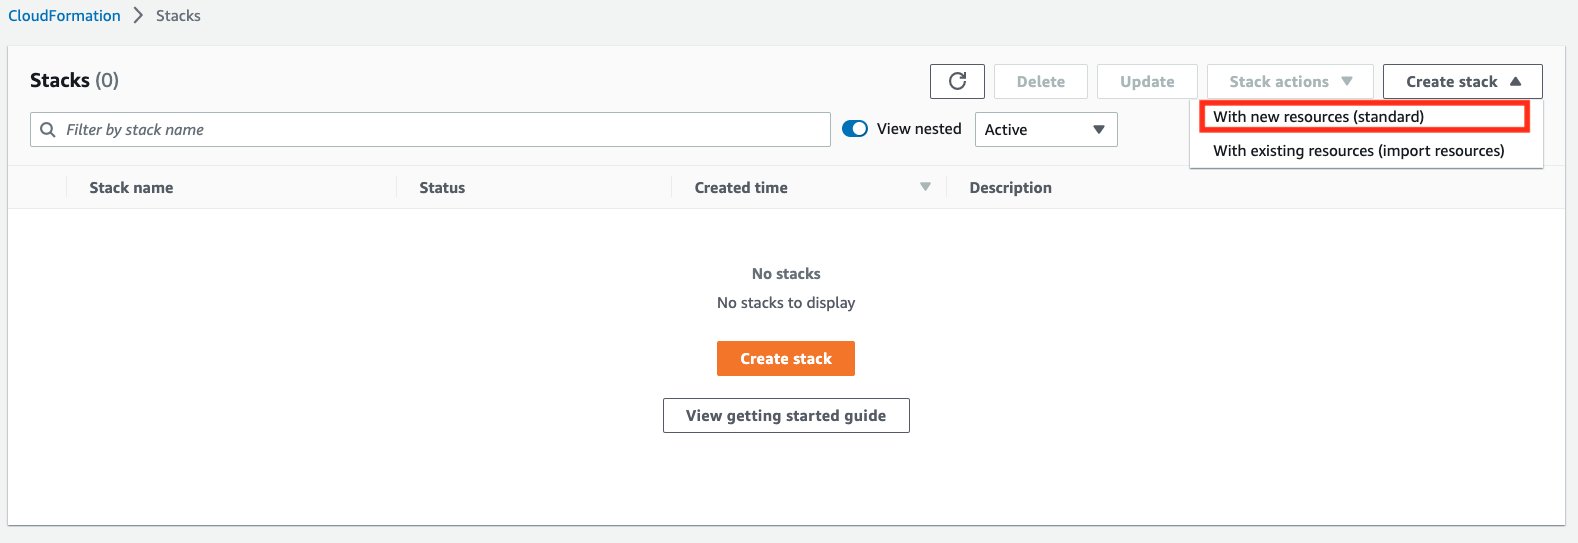
- Choose Create stack and then select With new resources (standard).
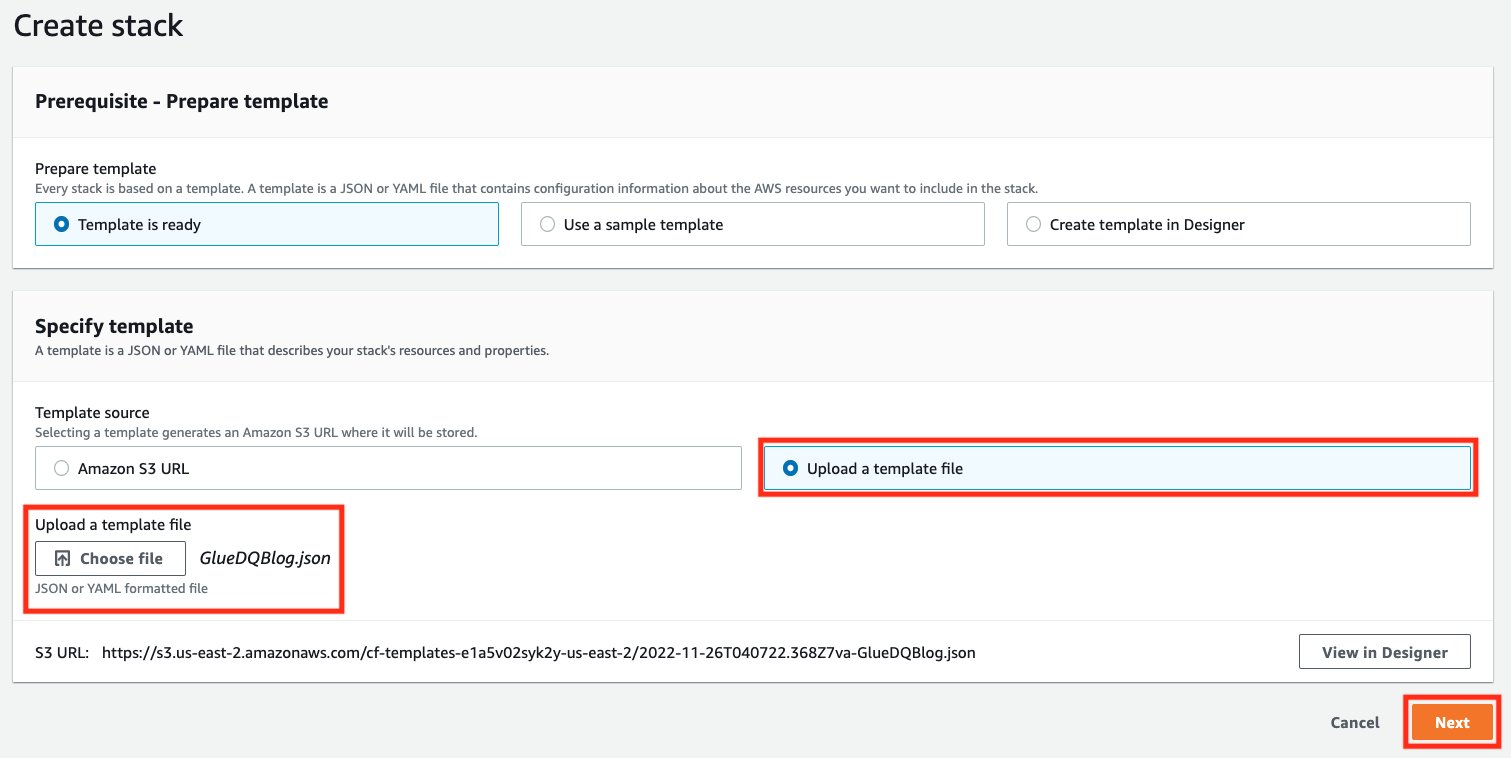
- For Template source, choose Upload a template File, and provide the above attached template file. Then choose Next.
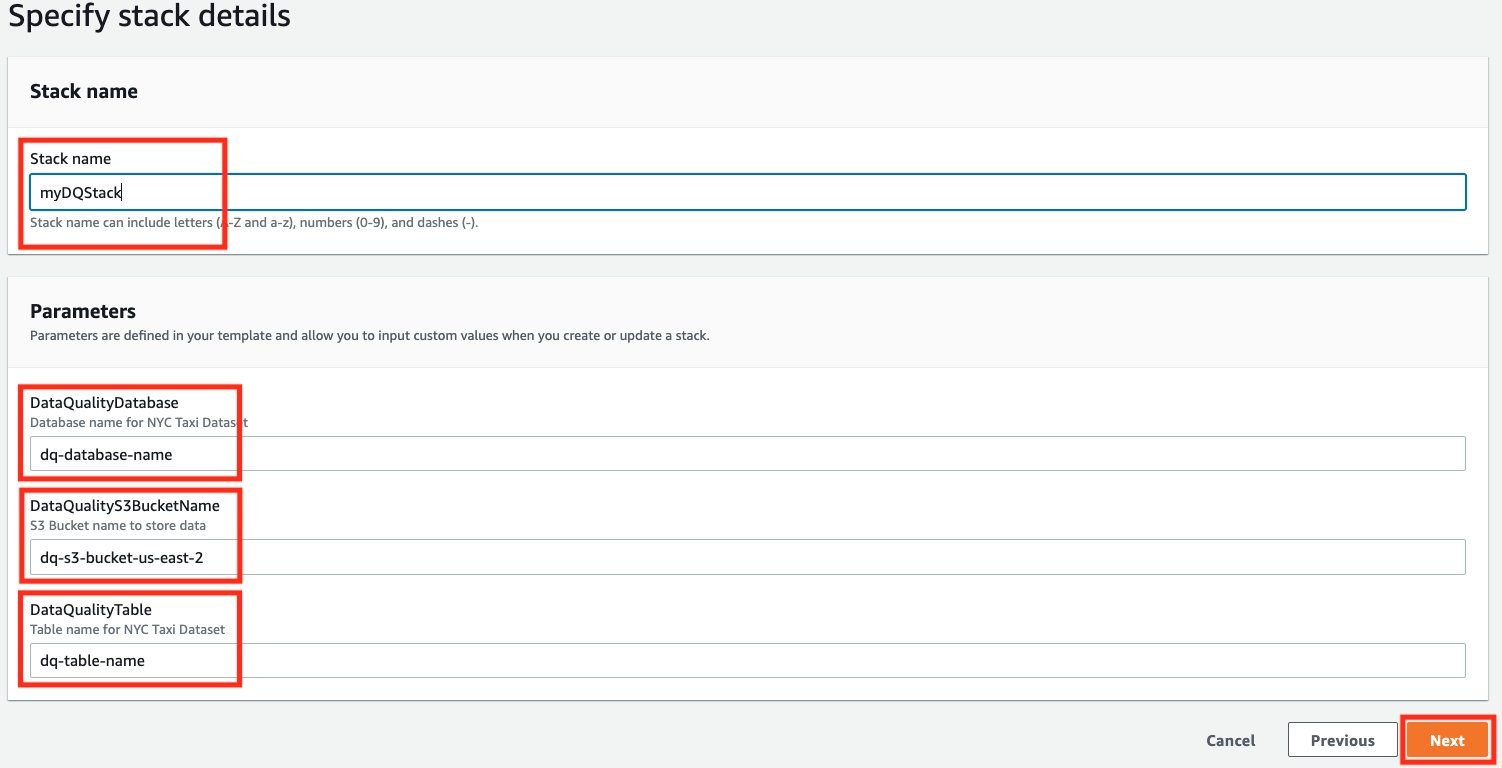
- For Stack name, DataQualityDatabase, and DataQualityTable, leave as default. For DataQualityS3BucketName, enter the name of your S3 bucket. Then choose Next.
- On the final screen, make sure to acknowledge that this stack would create IAM resources for you, and choose Submit.

- Once the stack is successfully created, navigate to the S3 bucket created by the stack and upload the yellow_tripdata_2022-01.parquet file.
Start an AWS Glue Data Quality run on your data in AWS Glue Data Catalog
In this first section, we will generate data quality rule recommendations from the AWS Glue Data Quality service. Using these recommendations, we will then run a data quality task against our dataset to obtain an analysis of our data.
To get started, complete the following steps:
- Open AWS Glue console.
- Choose Tables under Data Catalog.
- Select the DataQualityTable table created via the CloudFormation stack.
- Select the Data quality tab.

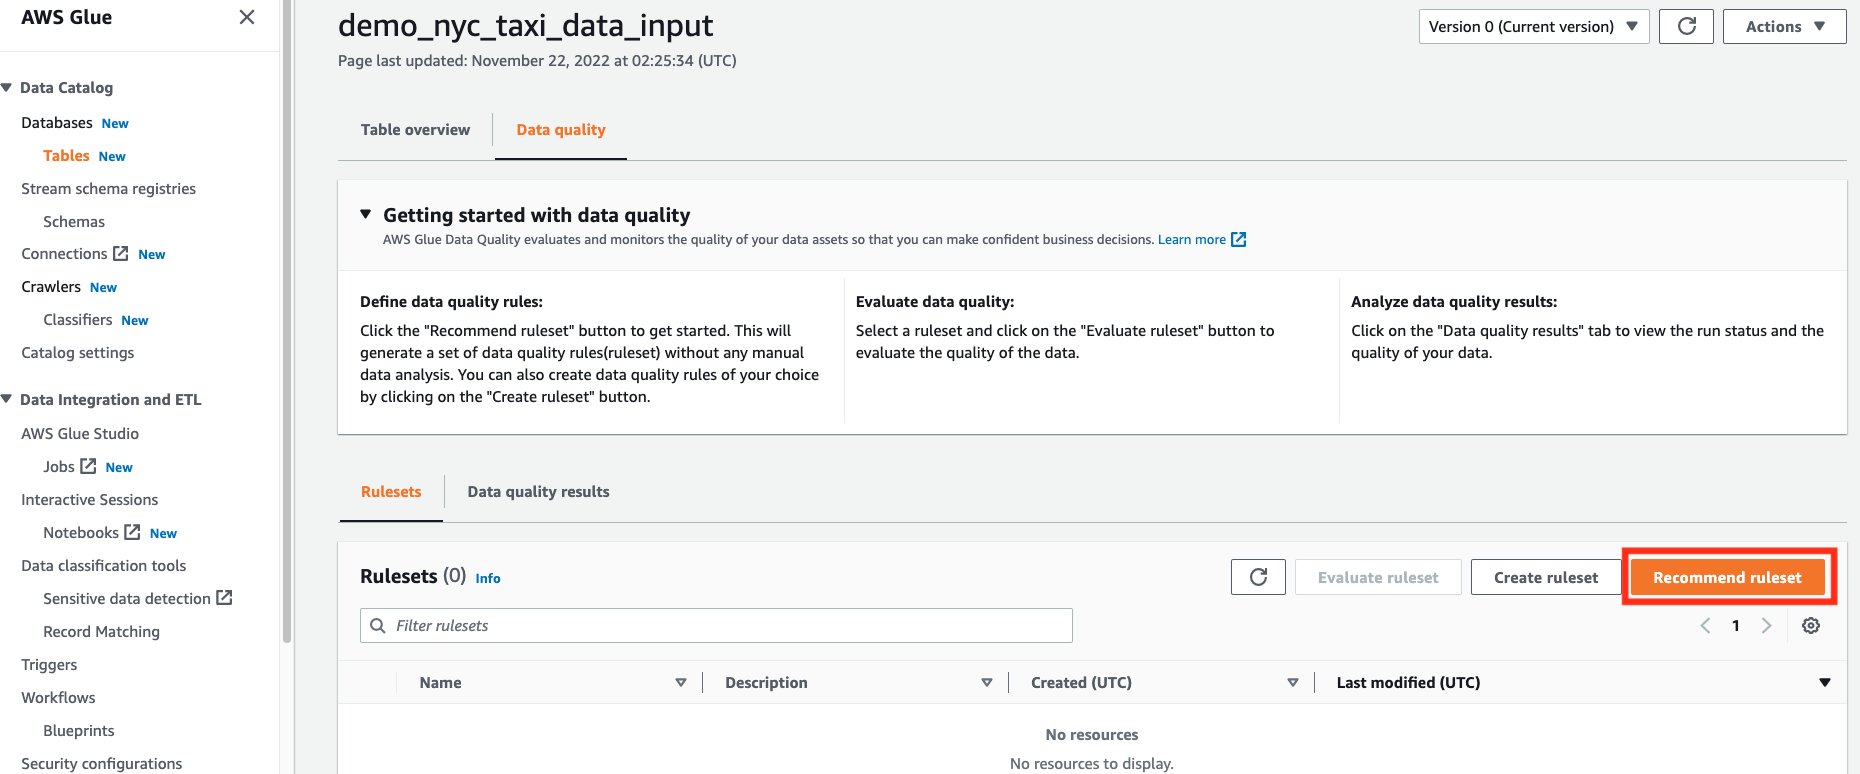
- Choose Recommend ruleset.
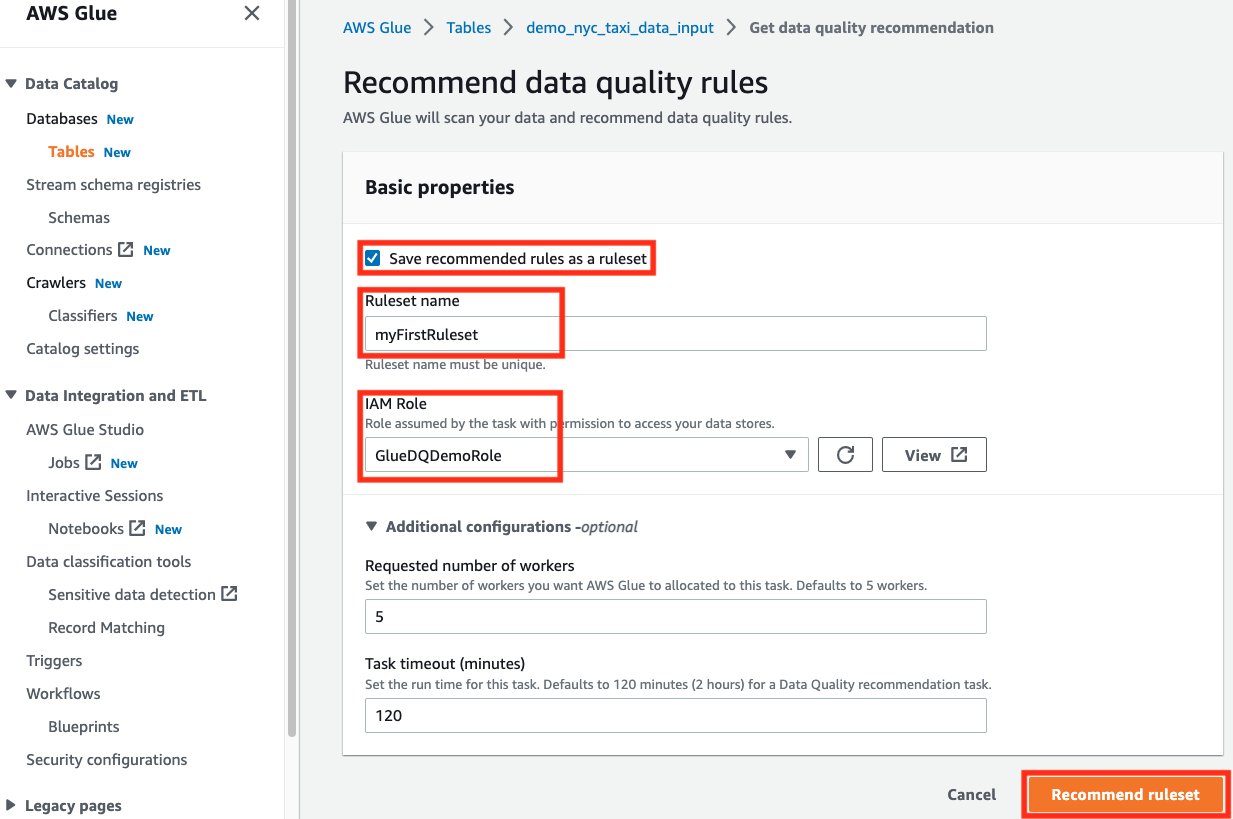
- On the Recommend data quality rules page, check Save recommended rules as a ruleset. This will allow us to save the recommended rules in a ruleset automatically, for use in the next steps.
- For IAM Role, choose the IAM role that was created from the CloudFormation stack.
- For Additional configurations -optional, leave the default number of workers and timeout.
- Choose Recommend ruleset. This will start a data quality recommendation run, with the given number of workers.
- Wait for the ruleset to be completed.
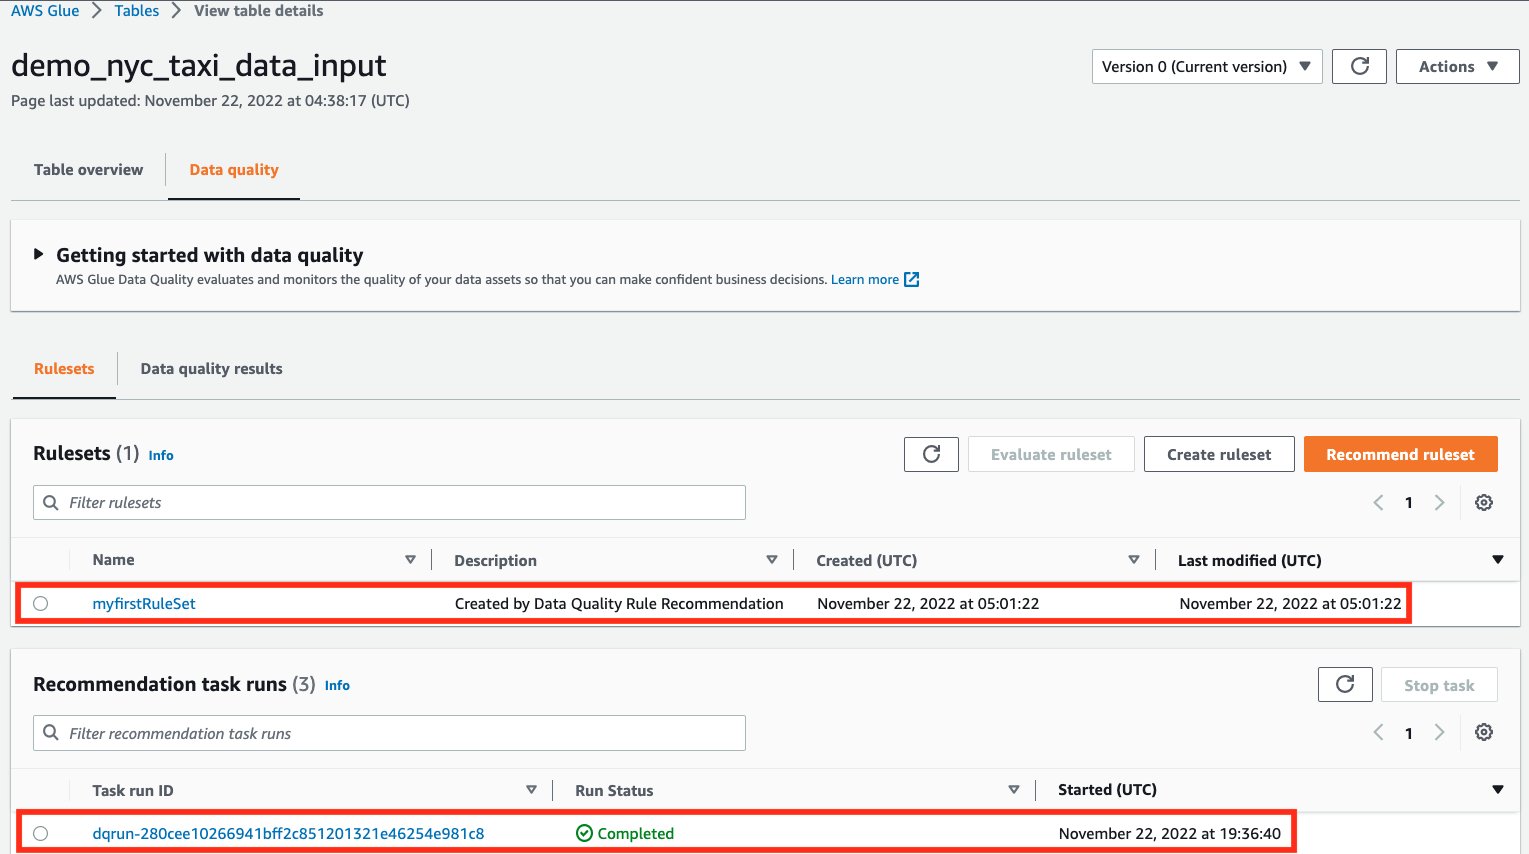
- Once completed, navigate back to the Rulesets tab. You should see a successful recommendation run and a ruleset created.
Understand AWS Glue Data Quality recommendations
AWS Glue Data Quality recommendations are suggestions generated by the AWS Glue Data Quality service and are based on the shape of your data. These recommendations automatically take into account aspects like RowCounts, Mean, Standard Deviation etc. of your data, and generate a set of rules, for you to use as a starting point.
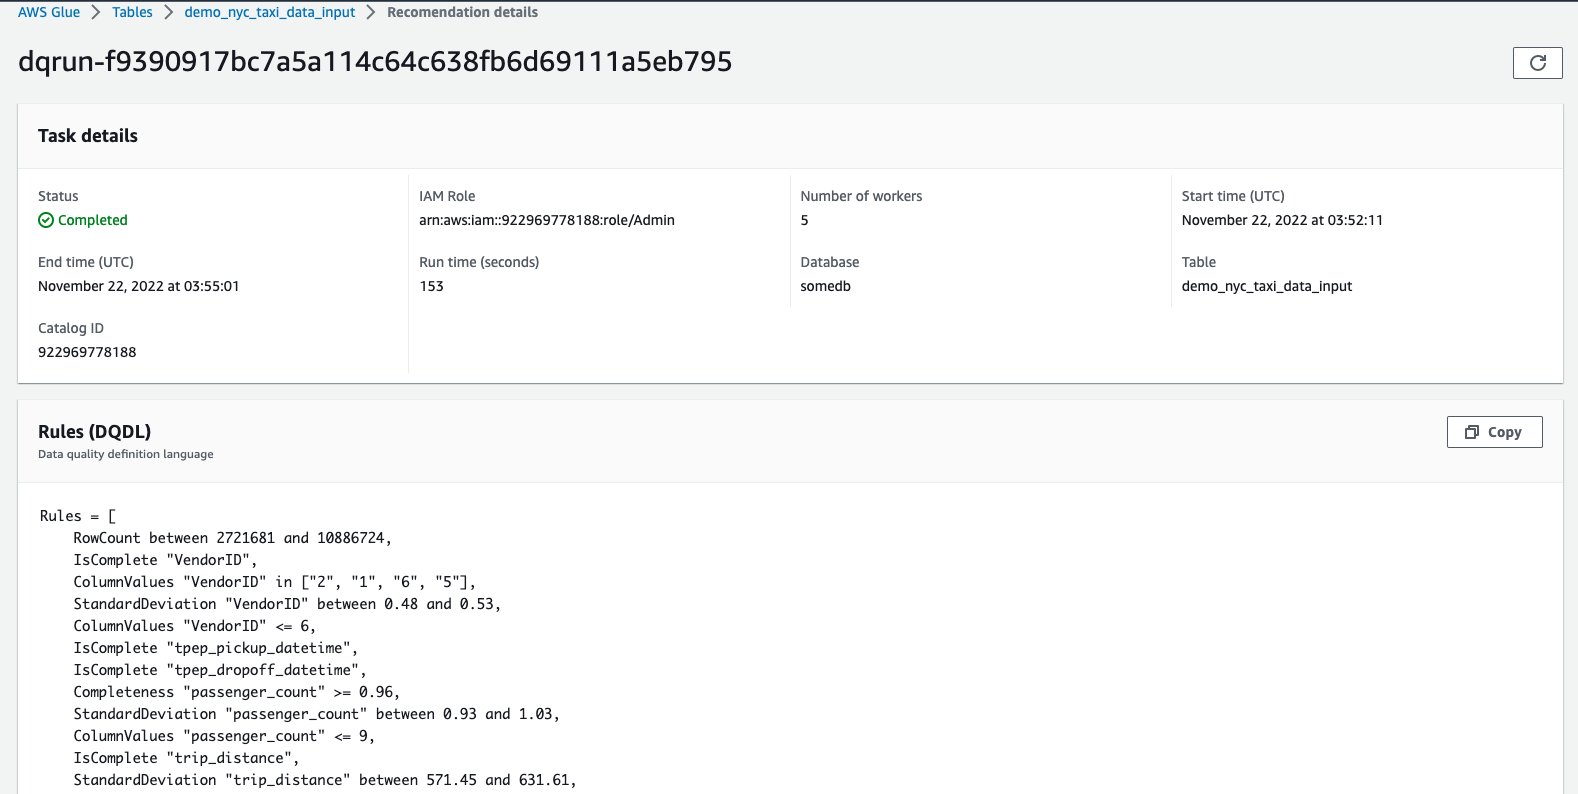
The dataset used here was the NYC Taxi dataset. Based on this, the columns in this dataset, and the values of those columns, AWS Glue Data Quality recommends a set of rules. In total, the recommendation service automatically took into consideration all the columns of the dataset, and recommended 55 rules.
Some of these rules are:
- “RowCount between <> and <> ” ? Expect a count of number of rows based on the data it saw
- “ColumnValues “VendorID” in [ ] ? Expect the ”VendorID“ column to be within a specific set of values
- IsComplete “VendorID” ? Expect the “VendorID” to be a non-null value
How do I use the recommended AWS Glue Data Quality rules?
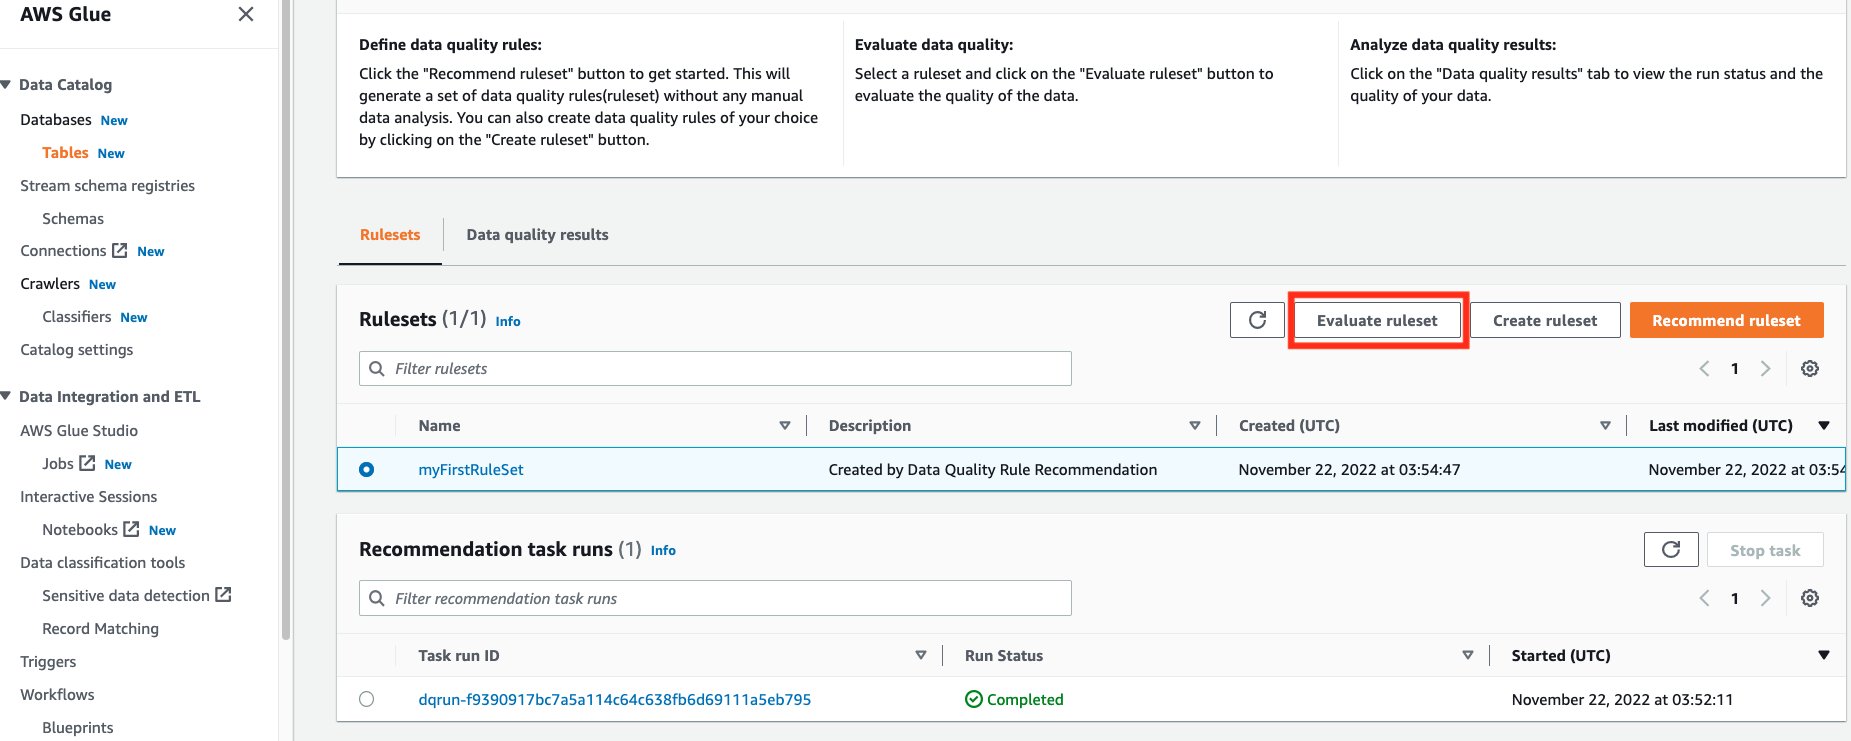
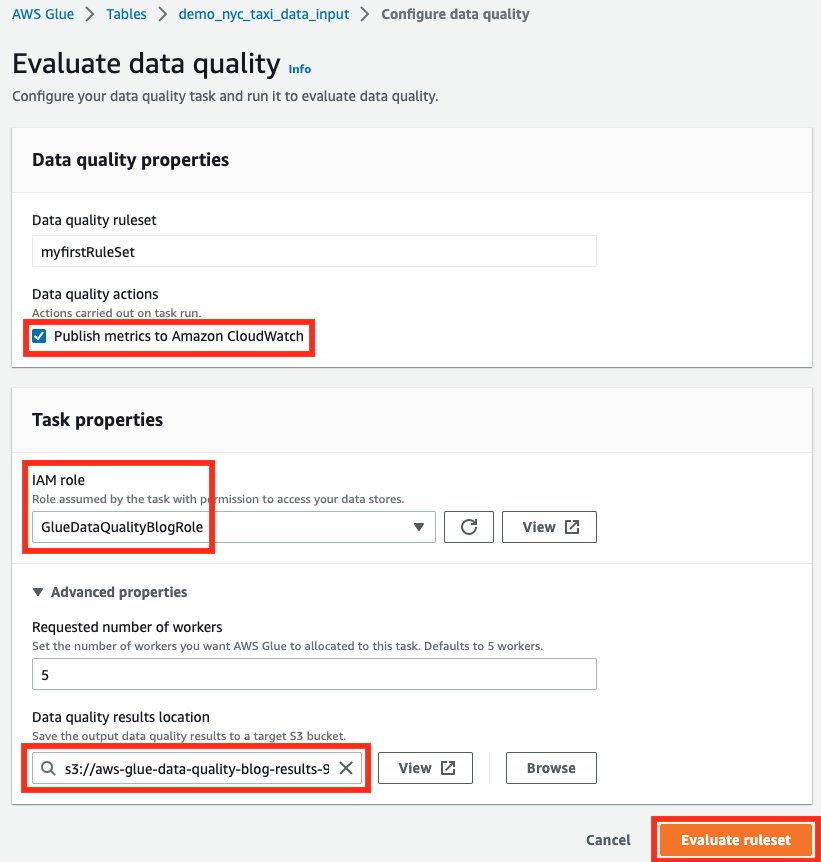
- From the Rulesets section, you should see your generated ruleset. Select the generated ruleset, and choose Evaluate ruleset.
- If you didn’t check the box to Save recommended rules as a ruleset when you ran the recommendation, you can still click on the recommendation task run and copy the rules to create a new ruleset
- If you didn’t check the box to Save recommended rules as a ruleset when you ran the recommendation, you can still click on the recommendation task run and copy the rules to create a new ruleset
- For Data quality actions under Data quality properties, select Publish metrics to Amazon CloudWatch. If this box isn’t checked, the data quality run will not publish metrics to Amazon CloudWatch.
- For IAM role, select the GlueDataQualityBlogRole created in the AWS CloudFormation stack.
- For Requested number of workers under Advanced properties, leave as default.
- For Data quality results location, select the value of the GlueDataQualityResultsS3Bucket location that was created via the AWS CloudFormation stack
- Choose Evaluate ruleset.
- Once the run begins, you can see the status of the run on the Data quality results tab.
- After the run reaches a successful stage, select the completed data quality task run, and view the data quality results shown in Run results.
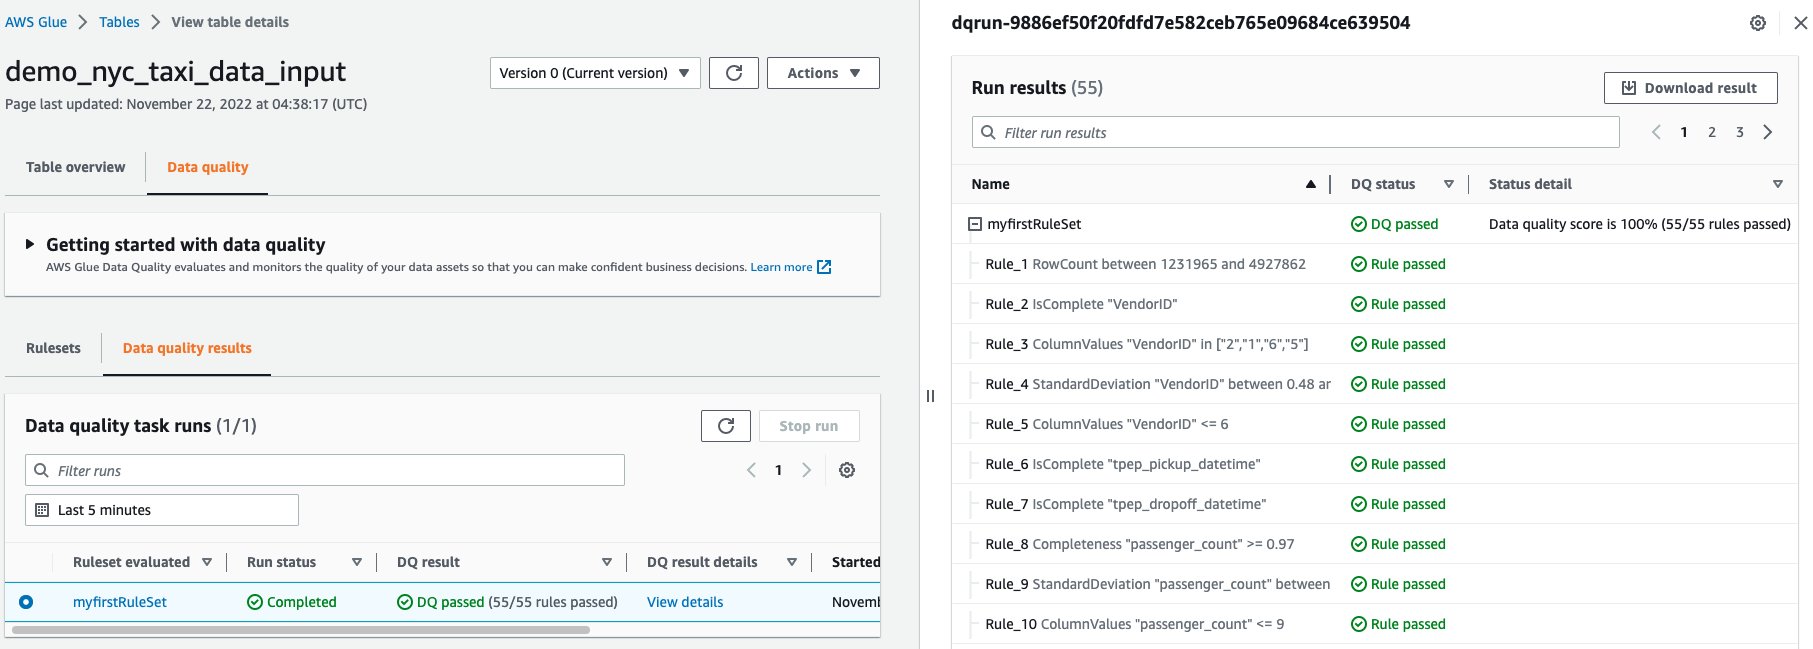
Our recommendation service suggested that we enforce 55 rules, based on the column values and the data within our NYC Taxi dataset. We then converted the collection of 55 rules into a RuleSet. Then, we ran a Data Quality Evaluation task run using our RuleSet against our dataset. In our results above, we see the status of each within the RuleSet.
You can also utilize the AWS Glue Data Quality APIs to carry out these steps.
Get Amazon SNS notifications for my failing data quality runs through Amazon CloudWatch alarms
Each AWS Glue Data Quality evaluation run from the Data Catalog, emits a pair of metrics named glue.data.quality.rules.passed (indicating a number of rules that passed) and glue.data.quality.rules.failed (indicating the number of failed rules) per data quality run. This emitted metric can be used to create alarms to alert users if a given data quality run falls below a threshold.
To get started with setting up an alarm that would send an email via an Amazon SNS notification, follow the steps below:
- Open Amazon CloudWatch console.
- Choose All metrics under Metrics. You will see an additional namespace under Custom namespaces titled Glue Data Quality.
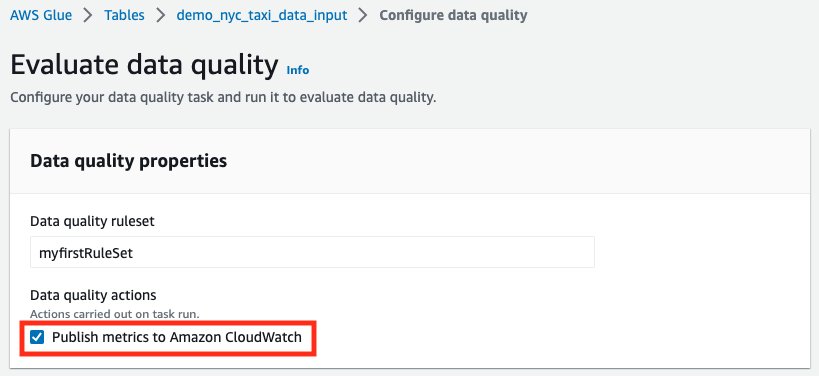
Note: When starting an AWS Glue Data Quality run, make sure the Publish metrics to Amazon CloudWatch checkbox is enabled, as shown below. Otherwise, metrics for that particular run will not be published to Amazon CloudWatch.
- Under the Glue Data Quality namespace, you should be able to see metrics being emitted per table, per ruleset. For the purpose of our blog, we shall be using the glue.data.quality.rules.failed rule and alarm, if this value goes over 1 (indicating that, if we see a number of failed rule evaluations greater than 1, we would like to be notified).

- In order to create the alarm, choose All alarms under Alarms.
- Choose Create alarm.
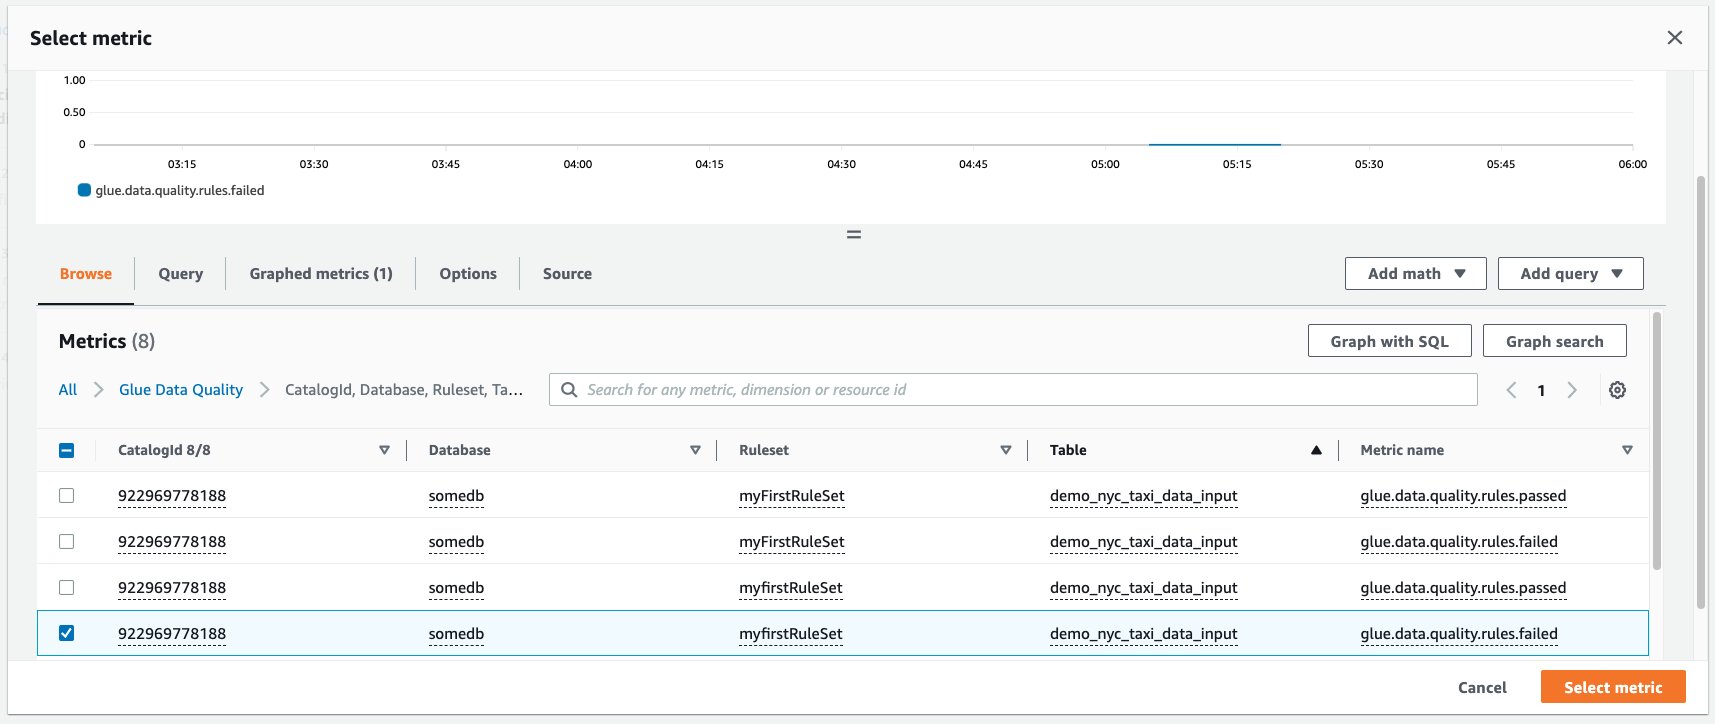
- Choose Select metric.

- Select the glue.data.quality.rules.failed metric corresponding to the table you’ve created, then choose Select metric.
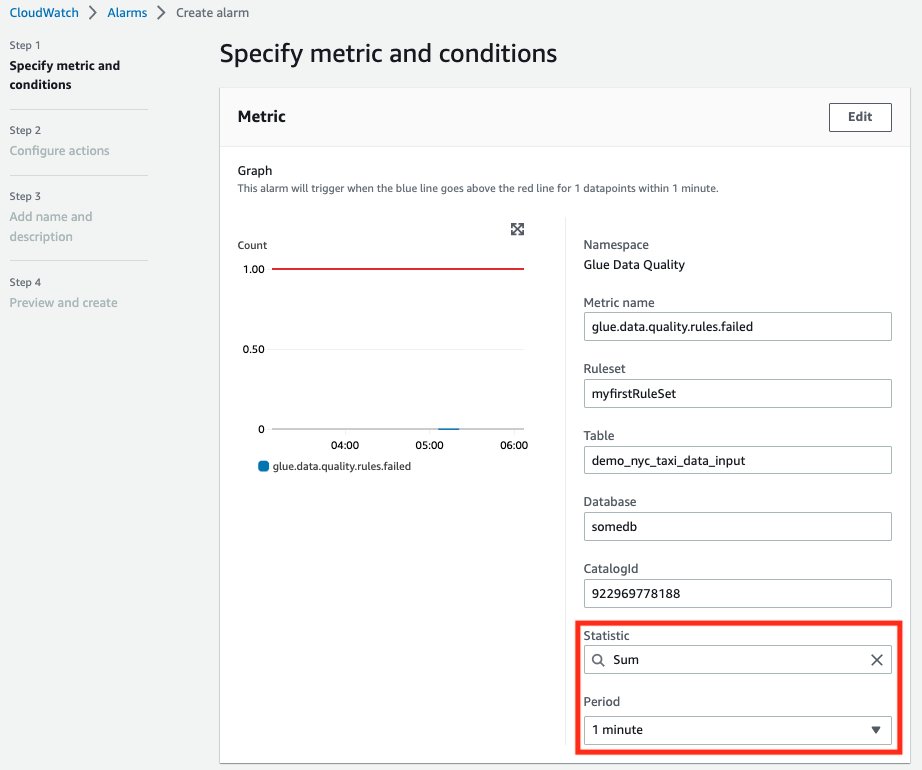
- Under the Specify metric and conditions tab, under the Metrics section:
- For Statistic, select Sum.
- For Period, select 1 minute.
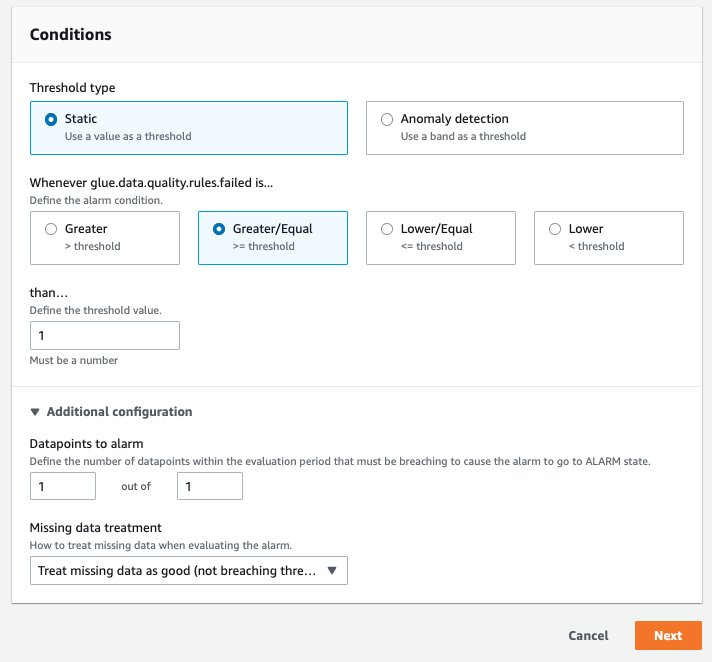
- Under the Conditions section:
- For Threshold type, choose Static.
- For Whenever glue.data.quality.rules.failed is…, select Greater/Equal.
- For than…, enter 1 as the threshold value.
- Expand the Additional configurations dropdown and select Treat missing data as good
These selections imply that if the glue.data.quality.rules.failed metric emits a value greater than or equal to 1, we will trigger an alarm. However, if there is no data, we will treat it as acceptable.
- Choose Next.
- On Configure actions:
- For the Alarm state trigger section, select In alarm .
- For Send a notification to the following SNS topic, choose Create a new topic to send a notification via a new SNS topic.
- For Email endpoints that will receive the notification…, enter your email address. Choose Next.
- For Alarm name, enter myFirstDQAlarm, then choose Next.
- Finally, you should see a summary of all the selections on the Preview and create screen. Choose Create alarm at the bottom.
- You should now be able to see the alarm being created from the Amazon CloudWatch alarms dashboard.
In order to demonstrate AWS Glue Data Quality alarms, we are going to go over a real-world scenario where we have corrupted data being ingested, and how we could use the AWS Glue Data Quality service to get notified of this, using the alarm we created in the previous steps. For this purpose, we will use the provided file malformed_yellow_taxi.parquet that contains data that has been tweaked on purpose.
- Navigate to the S3 location DataQualityS3BucketName mentioned in the CloudFormation template supplied at the beginning of the blog post.
- Upload the malformed_yellow_tripdata.parquet file to this location. This will help us simulate a flow where we have a file with poor data quality coming into our data lakes via our ETL processes.
- Navigate to the AWS Glue Data Catalog console, select the demo_nyc_taxi_data_input that was created via the provided AWS CloudFormation template and then navigate to the Data quality tab.
- Select the RuleSet we had created in the first section. Then select Evaluate ruleset.
- From the Evaluate data quality screen:
- Check the box to Publish metrics to Amazon CloudWatch. This checkbox is needed to ensure that the failure metrics are emitted to Amazon CloudWatch.
- Select the IAM role created via the AWS CloudFormation template.
- Optionally, select an S3 location to publish your AWS Glue Data Quality results.
- Select Evaluate ruleset.
- Navigate to the Data Quality results tab. You should now see two runs, one from the previous steps of this blog and one that we currently triggered. Wait for the current run to complete.
- As you see, we have a failed AWS Glue Data Quality run result, with only 52 of our original 55 rules passing. These failures are attributed to the new file we uploaded to S3.
- Navigate to the Amazon CloudWatch console and select the alarm we created at the beginning of this section.
- As you can see, we configured the alarm to fire every time the glue.data.quality.rules.failed metric crosses a threshold of 1. After the above AWS Glue Data Quality run, we see 3 rules failing, which triggered the alarm. Further, you also should have gotten an email detailing the alarm’s firing.
We have thus demonstrated an example where incoming malformed data, coming into our data lakes can be identified via the AWS Glue Data Quality rules, and subsequent alerting mechanisms can be created to notify appropriate personas.
Analyze your AWS Glue Data Quality run results through Amazon Athena
In scenarios where you have multiple AWS Glue Data Quality run results against a dataset, over a period of time, you might want to track the trends of the dataset’s quality over a period of time. To achieve this, we can export our AWS Glue Data Quality run results to S3, and use Amazon Athena to run analytical queries against the exported run. The results can then be further used in Amazon QuickSight to build dashboards to have a graphical representation of your data quality trends
In the third part of this post, we will see the steps needed to start tracking data on your dataset’s quality:
- For our data quality runs that we set up in the previous sections, we set the Data quality results location parameter to the bucket location specified by the AWS CloudFormation stack.
- After each successful run, you should see a single JSONL file being exported to your selected S3 location, corresponding to that particular run.
- Open the Amazon Athena console.
- In the query editor, run the following CREATE TABLE statement (replace the <my_table_name> with a relevant value, and <GlueDataQualityResultsS3Bucket_from_cfn> section with the
GlueDataQualityResultsS3Bucketvalue from the provided AWS CloudFormation template): - Once the above table is created, you should be able to run queries to analyze your data quality results.
For example, consider the following query that shows me the failed AWS Glue Data Quality runs against my table demo_nyc_taxi_data_input within a time window:
The output of the above query shows me details about all the runs with “outcome” = ‘Failed’ that ran against my NYC Taxi dataset table ( “tablename” = ‘demo_nyc_taxi_data_input’ ). The output also gives me information about the failure reason ( failurereason ) and the values it was evaluated against ( evaluatedmetrics ).
As you can see, we are able to get detailed information about our AWS Glue Data Quality runs, via the run results uploaded to S3, perform more detailed analysis and build dashboards on top of the data.
Clean up
- Navigate to the Amazon Athena console and delete the table created for data quality analysis.
- Navigate to the Amazon CloudWatch console and delete the alarms created.
- If you deployed the sample CloudFormation stack, delete the CloudFormation stack via the AWS CloudFormation console. You will need to empty the S3 bucket before you delete the bucket.
- If you have enabled your AWS Glue Data Quality runs to output to S3, empty those buckets as well.
Conclusion
In this post, we talked about the ease and speed of incorporating data quality rules using the AWS Glue Data Quality feature, into your AWS Glue Data Catalog tables. We also talked about how to run recommendations and evaluate data quality against your tables. We then discussed analyzing the data quality results via Amazon Athena, and the process for setting up alarms via Amazon CloudWatch in order to notify users of failed data quality.
To dive into the AWS Glue Data Quality APIs, take a look at the AWS Glue Data Quality API documentation
To learn more about AWS Glue Data Quality, check out the AWS Glue Data Quality Developer Guide
About the authors
 Aniket Jiddigoudar is a Big Data Architect on the AWS Glue team.
 Joseph Barlan is a Frontend Engineer at AWS Glue. He has over 5 years of experience helping teams build reusable UI components and is passionate about frontend design systems. In his spare time, he enjoys pencil drawing and binge watching tv shows.

