When you first use a Windows 10 or Windows 11 device, you’ll find OneDrive is already installed and has added itself to your system’s File Explorer, which makes the service incredibly easy to use. However, if you find that having the program in File Explorer is unnecessary — then you might want to remove Microsoft OneDrive from File Explorer.
Aside from losing the quick access to your OneDrive folder, there is no major downside to removing it from the File Explorer. You will still retain all of the benefits that OneDrive normally provides, including backing up your local storage or the quick menu available by clicking the OneDrive icon in the system tray.
However, if you want to completely disable OneDrive because you are having problems using it or you just don’t want to use this service anymore, make sure to check out our guide on how to disable OneDrive to get rid of the entire app from your Windows-powered device. Although the constant syncs may be annoying, we do find that OneDrive has a plethora of neat features that, if harnessed properly, can give you the best cloud storage experience. So, if you’re still on the fence about OneDrive, make sure to read our OneDrive review as well as our articles about what OneDrive is and how you can fix OneDrive sync issues before you continue with this guide.
This post provides a step-by-step guide with images to help you remove the OneDrive app from File Explorer, so let’s dig in.
How to Remove OneDrive Shortcut From File Explorer – Edit the Windows Registry
To remove the OneDrive shortcut from the File Explorer without disabling OneDrive completely, you’ll have to edit the Windows registry. Because this can damage your Windows 10 or Windows 11 installation, you should follow Microsoft’s guide to backing up the registry so you can restore it if there’s an issue. Below, we will show you the steps for removing OneDrive from File Explorer on Windows 10, but the same steps can be used on Windows 11.
- Open the Registry Editor
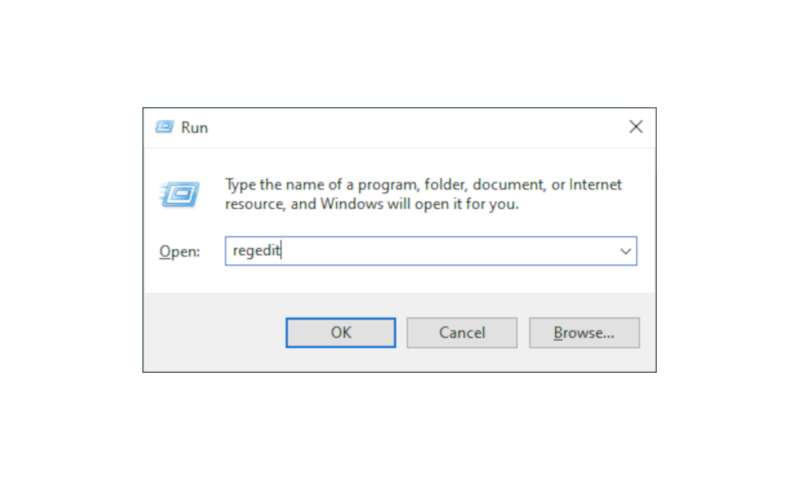
To start, you’ll need to open the registry editor. The easiest way to do this in Windows 10 is to open the “run” command box by pressing the Windows key and “R” key, then type ”regedit” and click “OK.”
- Find a Folder titled “CLSID”
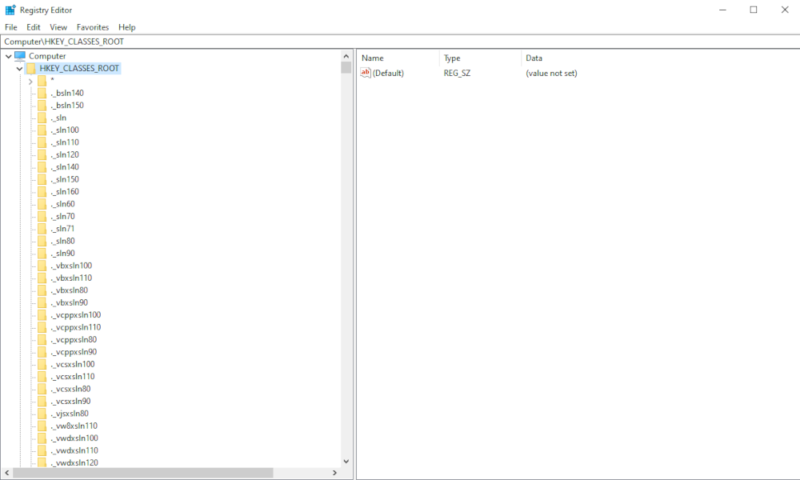
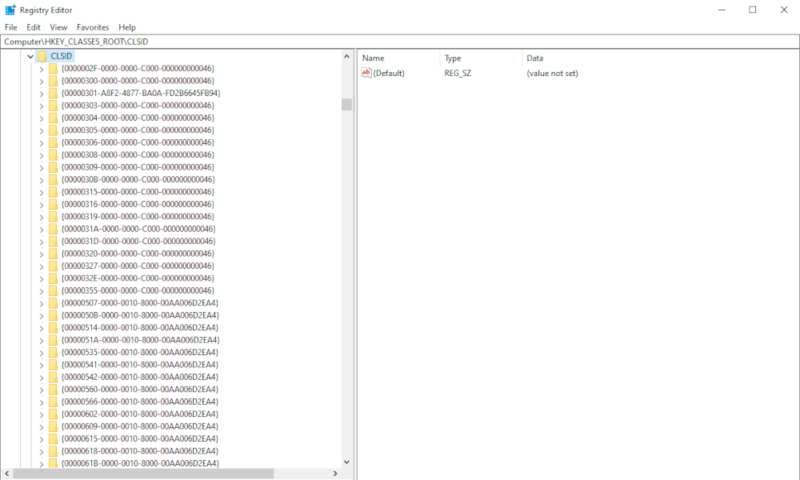
Within “HKEY_CLASSES_ROOT,” you will find a folder titled “CLSID.” Click that too.
- Find the Necessary Registry Entry
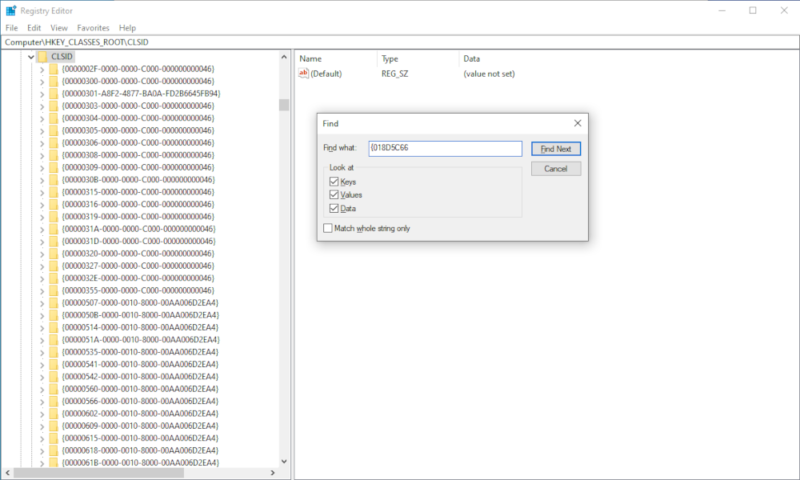
Find the registry entry titled “{018D5C66-4533-4307-9B53-224DE2ED1FE6}.” If you’re struggling to find it, press the “Ctrl” and “F” keys to open the “find” function, then paste in the string.
- Double Check You’re in the Right Place
When you’re in the correct entry, check that the full folder path reads “Computer\HKEY_CLASSES_ROOT\CLSID\{018D5C66-4533-4307-9B53-224DE2ED1FE6}” to make sure you’re in the right place.
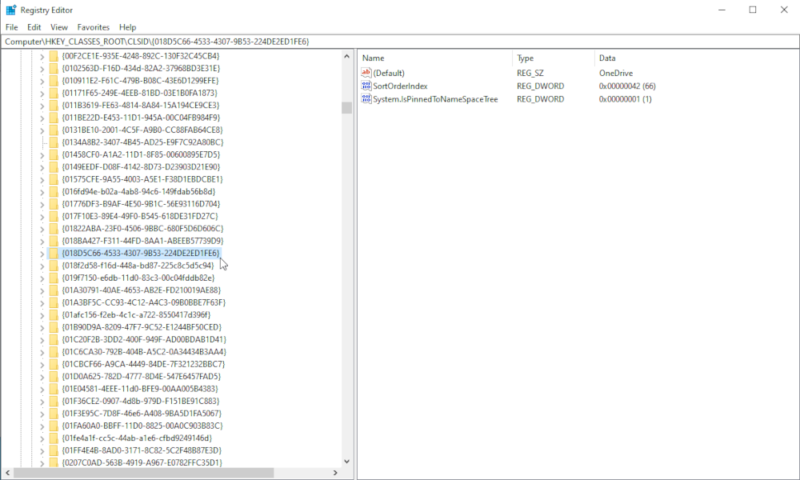
- Find the File Called “System.IsPinnedToNameSpaceTree”
Inside the “{018D5C66-4533-4307-9B53-224DE2ED1FE6}” entry, find the file called “System.IsPinnedToNameSpaceTree” and double-click it to bring up the “edit DWORD” window.
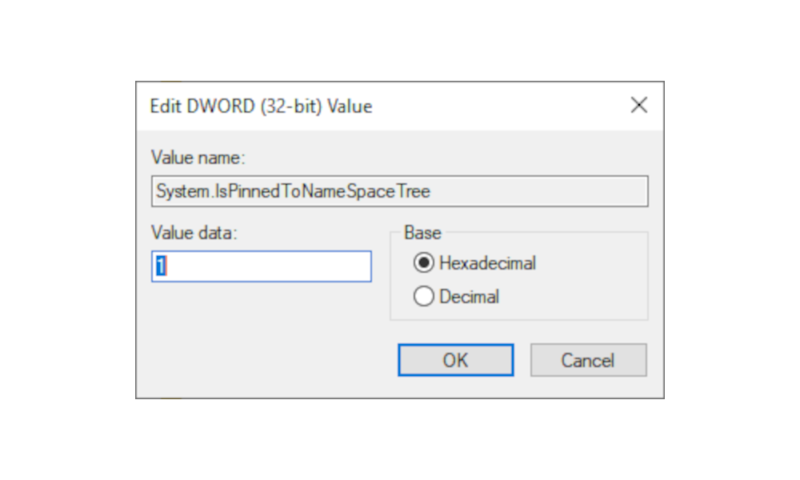
- Change the Entry Under “value data” From the Number One to a Zero
In this window, change the entry under “value data” from the number one to a zero and click “OK.”
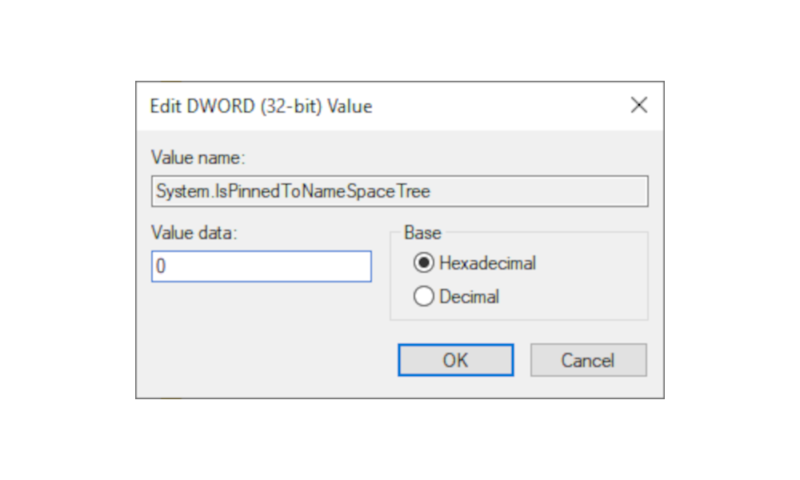
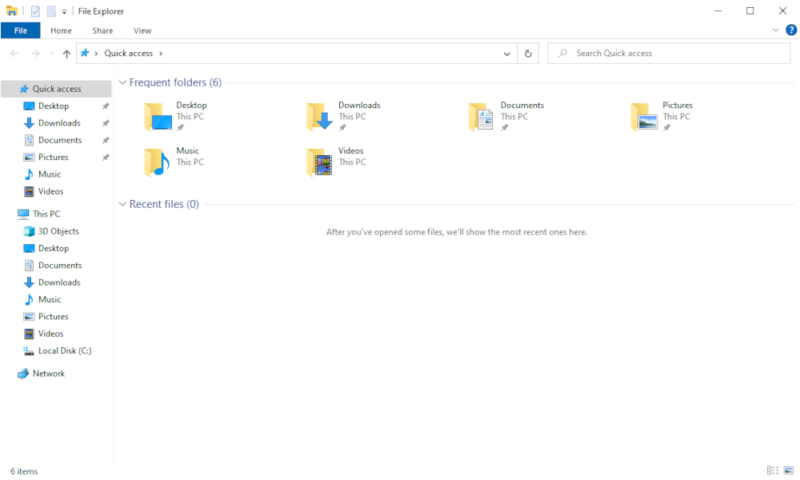
- Close the Window and Reopen File Explorer
Now close the window and reopen File Explorer. If you followed the steps correctly, OneDrive will no longer be in the sidebar.
{“@context”:”https:\/\/schema.org”,”@type”:”HowTo”,”name”:”Remove OneDrive From File Explorer – Editing the Windows Registry”,”description”:”These steps show how to remove OneDrive from Windows File Explorer by making the necessary edits to the Windows Registry.”,”totalTime”:”P00D02M00S”,”supply”:0,”tool”:0,”url”:”https:\/\/www.cloudwards.net\/how-to-remove-onedrive-from-file-explorer\/#remove-onedrive-from-file-explorer-editing-the-windows-registry”,”image”:{“@type”:”ImageObject”,”inLanguage”:”en-US”,”url”:”https:\/\/www.cloudwards.net\/wp-content\/uploads\/2020\/08\/How-to-remove-OneDrive-from-File-Explorer-1.png”},”step”:[{“@type”:”HowToStep”,”name”:”Open the Registry Editor”,”position”:1,”url”:”https:\/\/www.cloudwards.net\/how-to-remove-onedrive-from-file-explorer\/#open-the-registry-editor”,”itemListElement”:{“@type”:”HowToDirection”,”text”:”To start, you\u2019ll need to open the registry editor. The easiest way to do this in Windows 10 is to open the \u201crun\u201d command box by pressing the Windows key and \u201cR\u201d key, then type \u201dregedit\u201d and click \u201cOK.\u201d\n”},”image”:{“@type”:”ImageObject”,”inLanguage”:”en-US”,”url”:”https:\/\/www.cloudwards.net\/wp-content\/uploads\/2020\/08\/Windows_Run_Box_Regedit.png”}},{“@type”:”HowToStep”,”name”:”Navigate to the \u201cHKEY_CLASSES_ROOT\” Folder”,”position”:2,”url”:”https:\/\/www.cloudwards.net\/how-to-remove-onedrive-from-file-explorer\/#navigate-to-the-hkey_classes_root-folder”,”itemListElement”:{“@type”:”HowToDirection”,”text”:”In the Windows registry editor, under \u201ccomputer,\u201d there will be a folder titled \u201cHKEY_CLASSES_ROOT.\u201d Click it.\n”},”image”:{“@type”:”ImageObject”,”inLanguage”:”en-US”,”url”:”https:\/\/www.cloudwards.net\/wp-content\/uploads\/2020\/08\/Windows_Registry_HKEY_CLASSES_ROOT.png”}},{“@type”:”HowToStep”,”name”:”Find a Folder titled \u201cCLSID\u201d”,”position”:3,”url”:”https:\/\/www.cloudwards.net\/how-to-remove-onedrive-from-file-explorer\/#find-a-folder-titled-clsid”,”itemListElement”:{“@type”:”HowToDirection”,”text”:”Within \u201cHKEY_CLASSES_ROOT,\u201d you will find a folder titled \u201cCLSID.\u201d Click that too.\n”},”image”:{“@type”:”ImageObject”,”inLanguage”:”en-US”,”url”:”https:\/\/www.cloudwards.net\/wp-content\/uploads\/2020\/08\/Windows_Registry_CLSID.png”}},{“@type”:”HowToStep”,”name”:”Find the Necessary Registry Entry”,”position”:4,”url”:”https:\/\/www.cloudwards.net\/how-to-remove-onedrive-from-file-explorer\/#find-the-necessary-registry-entry”,”itemListElement”:{“@type”:”HowToDirection”,”text”:”Find the registry entry titled \u201c{018D5C66-4533-4307-9B53-224DE2ED1FE6}.\u201d If you\u2019re struggling to find it, press the \u201cCtrl\u201d and \u201cF\u201d keys to open the \u201cfind\u201d function, then paste in the string.\n”},”image”:{“@type”:”ImageObject”,”inLanguage”:”en-US”,”url”:”https:\/\/www.cloudwards.net\/wp-content\/uploads\/2020\/08\/Windows_Registry_Find_Feature.png”}},{“@type”:”HowToStep”,”name”:”Double Check You’re in the Right Place”,”position”:5,”url”:”https:\/\/www.cloudwards.net\/how-to-remove-onedrive-from-file-explorer\/#double-check-youre-in-the-right-place”,”itemListElement”:{“@type”:”HowToDirection”,”text”:”When you\u2019re in the correct entry, check that the full folder path reads \u201cComputer\\HKEY_CLASSES_ROOT\\CLSID\\{018D5C66-4533-4307-9B53-224DE2ED1FE6}\u201d to make sure you\u2019re in the right place.\n”},”image”:{“@type”:”ImageObject”,”inLanguage”:”en-US”,”url”:”https:\/\/www.cloudwards.net\/wp-content\/uploads\/2020\/08\/Windows_Registry_Final_Path.png”}},{“@type”:”HowToStep”,”name”:”Find the File Called \u201cSystem.IsPinnedToNameSpaceTree\u201d”,”position”:6,”url”:”https:\/\/www.cloudwards.net\/how-to-remove-onedrive-from-file-explorer\/#find-the-file-called-system-ispinnedtonamespacetree”,”itemListElement”:{“@type”:”HowToDirection”,”text”:”Inside the \u201c{018D5C66-4533-4307-9B53-224DE2ED1FE6}\u201d entry, find the file called \u201cSystem.IsPinnedToNameSpaceTree\u201d and double-click it to bring up the \u201cedit DWORD\u201d window.\n”},”image”:{“@type”:”ImageObject”,”inLanguage”:”en-US”,”url”:”https:\/\/www.cloudwards.net\/wp-content\/uploads\/2020\/08\/Windows_Registry_Edit_DWORD.png”}},{“@type”:”HowToStep”,”name”:”Change the Entry Under \u201cvalue data\u201d From the Number One to a Zero”,”position”:7,”url”:”https:\/\/www.cloudwards.net\/how-to-remove-onedrive-from-file-explorer\/#change-the-entry-under-value-data-from-the-number-one-to-a-zero”,”itemListElement”:{“@type”:”HowToDirection”,”text”:”In this window, change the entry under \u201cvalue data\u201d from the number one to a zero and click \u201cOK.\u201d\n”},”image”:{“@type”:”ImageObject”,”inLanguage”:”en-US”,”url”:”https:\/\/www.cloudwards.net\/wp-content\/uploads\/2020\/08\/Windows_Registry_Value_Data_Set_Zero.png”}},{“@type”:”HowToStep”,”name”:”Close the Window and Reopen File Explorer”,”position”:8,”url”:”https:\/\/www.cloudwards.net\/how-to-remove-onedrive-from-file-explorer\/#close-the-window-and-reopen-file-explorer”,”itemListElement”:{“@type”:”HowToDirection”,”text”:”Now close the window and reopen File Explorer. If you followed the steps correctly, OneDrive will no longer be in the sidebar.\n”},”image”:{“@type”:”ImageObject”,”inLanguage”:”en-US”,”url”:”https:\/\/www.cloudwards.net\/wp-content\/uploads\/2020\/08\/OneDrive_Removed_From_File_Explorer.png”}}]}
Final Thoughts
When it comes to ease of use, OneDrive is one of the best cloud storage services, so it isn’t surprising that there is a way to hide the program. Despite the limited choices, removing OneDrive from the File Explorer is straightforward and won’t cause any damage when done correctly.
However, if you want a cloud storage option that doesn’t clutter the File Explorer and you aren’t willing to edit the Windows 10/11 registry because you’re worried you’ll mess it up, there are other online storage options. For example, you can simply disable OneDrive and get a cloud storage service like Sync.com and pCloud which run within separate apps, so they don’t interfere with File Explorer.
Have you tried to remove OneDrive from the Windows File Explorer? How did it go? Let us know your thoughts in the comments section below. Thanks for reading.
-
No. If you remove OneDrive from the File Explorer on your Windows device, all the files backed up on OneDrive will still be there. You will still be able to access your files via the OneDrive website or app.
-
Removing OneDrive from File Explorer will not get rid of the app from your device. It will only remove the shortcut from your File Explorer. That means that OneDrive will still remain functional on your device and you can access it whenever you wish. If you want to get OneDrive back on File Explorer, all you have to do is reverse the steps you took to remove it.
-
Yes, you can. Some of the best alternatives to OneDrive are Sync.com, pCloud, Icedrive, and MEGA. You can also use Google Drive or Dropbox.
{“@context”:”https:\/\/schema.org”,”@type”:”FAQPage”,”mainEntity”:[{“@type”:”Question”,”name”:”Does removing OneDrive from the File Explorer delete all the files from the cloud?”,”acceptedAnswer”:{“@type”:”Answer”,”text”:”
No. If you remove OneDrive from the File Explorer on your Windows device, all the files backed up on OneDrive will still be there. You will still be able to access your files via the OneDrive website or app.\n”}},{“@type”:”Question”,”name”:”Can I enable OneDrive again after removing it from File Explorer?”,”acceptedAnswer”:{“@type”:”Answer”,”text”:”
Removing OneDrive from File Explorer will not get rid of the app from your device. It will only remove the shortcut from your File Explorer. That means that OneDrive will still remain functional on your device and you can access it whenever you wish. If you want to get OneDrive back on File Explorer, all you have to do is reverse the steps you took to remove it.\n”}},{“@type”:”Question”,”name”:”Can I use a different cloud storage service other than OneDrive?”,”acceptedAnswer”:{“@type”:”Answer”,”text”:”
Yes, you can. Some of the best alternatives to OneDrive are Sync.com,\u00a0pCloud, Icedrive, and MEGA. You can also use Google Drive or Dropbox.\n”}}]}
The post How to Remove OneDrive From File Explorer in 2024 appeared first on Cloudwards.

